If you’re a long time follower of Budget Bytes, you know that my freezer is my best friend. I use it to freeze leftover ingredients, leftover portions of cooked meals, and to stock up on sale items like cheese and meat. But I’ve also come to realize that there is a large grey area when it comes to freezing food. There is no clear line dividing foods that freeze well and those that don’t and there is no definitive cut off date for when frozen foods go from good to bad. That being said, I wanted to write a tutorial about how I freeze leftovers to give you a jumping off point, or a place to start experimenting with freezing food for yourselves. …Because it will take experimentation. Experimentation to find which methods produce results that you’re happy with and how to balance the effort with the savings in your own kitchen.

All recipes are rigorously tested in our Nashville Test Kitchen to ensure they are easy, affordable, and delicious.
In this tutorial I’ll provide you with links to reputable resources for information about freezing food, the methods that I use to freeze my leftover meals and ingredients, as well as a nifty little printable chart I developed to keep track of the leftovers in my freezer.
Ready to get started?
Safety Guidelines
The most comprehensive information that I’ve found surrounding freezing food comes from the FDA and the National Center for Home Food Preservation. They’ve done far more research than I have (obvi) and have compiled the information into clear and concise charts and FAQs. So, read these first or at least bookmark them for future reference:
- Freezing and Food Safety FAQs
- Refrigerator and Freezer Storage Times (chart)
- Refrigerator and Freezer Storage Times (an even bigger chart, pdf)
- General Freezing Information
What Freezes Well?
That’s the question of the hour, my friends. Unfortunately, there is no definitive answer. Food undergoes a number of changes during the freeze/thaw process, and some people are more sensitive to those changes than others. Ice crystals, dehydration (aka freezer burn), and enzymes can all produce changes in the texture, appearance, and flavor of food that is stored in the freezer. These changes and how much they bother you is what makes freezing so subjective and will require your experimentation. Below are some general lists of what I think freezes well and what doesn’t.
Do Freeze: soups, stews, casseroles, saucy pasta and rice dishes, raw meat or seafood, broth, bread, cookies, baked goods, tortillas, cheese (grated or in block form), tomato paste, pesto, buttermilk, butter, ginger, cooked beans, cooked rice or pasta, fresh fruit for smoothies or baking, vegetables for soups or stews.
Do Not Freeze: cream sauces, custards, high water content vegetables (like lettuce, cucumber, tomato), sour cream, mayonnaise, fried foods, anything with gelatin.
Eggs are an item that rests comfortably in the middle. Raw eggs can be frozen if taken out of the shell, but cooked eggs tend to seep water and get over cooked when reheated. I have frozen quiches and other egg dishes with success, but I suspect not everyone would be as happy with the results as I was.
Here are some other comprehensive lists of what freezes well and what doesn’t, for comparison:
- THE CHILL FACTOR / The Guide to What Freezes, What Doesn’t, and Why
- Foods That Do Not Freeze Well
- 17 Foods You Didn’t Even Know You Can Freeze
If you’re wondering what my favorite foods are to freeze, check out my Top 10 Recipes for Freezer Leftovers.
How to Freeze Leftover Food
My goals when freezing food are to avoid freezer burn, to make the food reheatable in the portions that I need, AND to make sure the food is identifiable in a sea full of frozen foods. So, when I freeze food I ask myself: How can I package this to reduce air exposure? What portion and I likely to use or eat of this food in the future? and Is it labeled?
Step 1: Portion
I start with portioning because that happens before the food is wrapped up. I tend to freeze pieces of meat individually, so that I can thaw as little as one at a time if needed. Leftover cooked food gets frozen in individual serving size containers, so that I can reheat one meal at a time (like a homemade TV dinner!).
Cooked beans, rice, or pasta usually gets frozen in 2 cup portions (or close to the volume of one can of beans) because that’s usually about how much I’ll use in a recipe. Tomato paste, pesto, or buttermilk get frozen in 1-2 Tbsp portions. The goal of portioning is to avoid thawing all of your frozen stash when you only need to use a little. Repeated thawing and refreezing drastically reduces quality and creates many more opportunities for food safety risks.
Step 2: Package Properly
Reducing air exposure is key to preventing freezer burn and maintaining the foods’ appearance and quality. So, it’s important to use heavy duty, freezer grade products. Regular plastic wrap and original food packaging may be air permeable and won’t protect against dehydration well. So, my go-to items are quart and gallon sized freezer bags and reusable Ziploc containers (similar freezer, microwave, and dishwasher safe containers are also made by other brands).
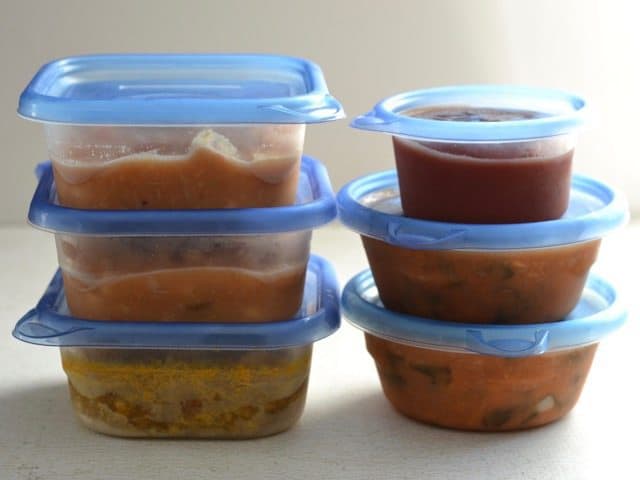
Ziploc Containers: I use the hard sided Ziploc containers to store leftover portions of soups, stews, and casseroles. I like the containers for pre-portioned meals because they can go straight from the freezer to the microwave, without the need for dirtying more dishes.
Freezer Bags: Freezer bags are my favorite because you can squeeze out the excess air from around the food. For irregular shaped foods, I often wrap them in an extra layer of plastic within the freezer bag (or rewrap in the original packaging and place within a freezer bag), just to further reduce air flow around the food.
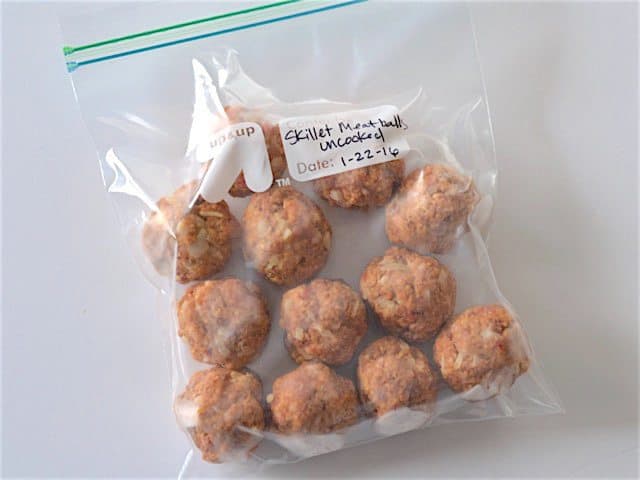
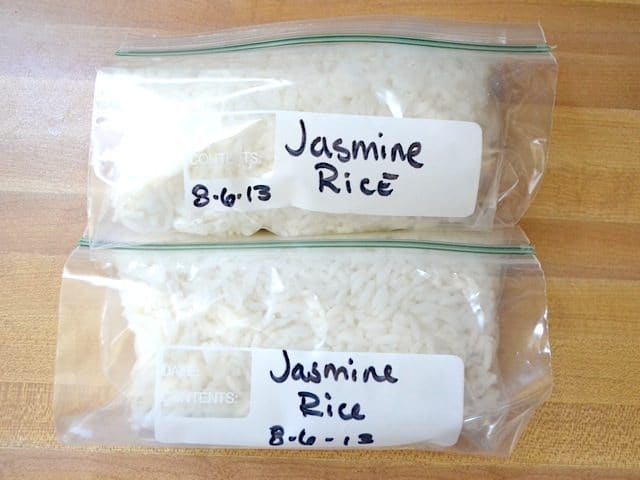
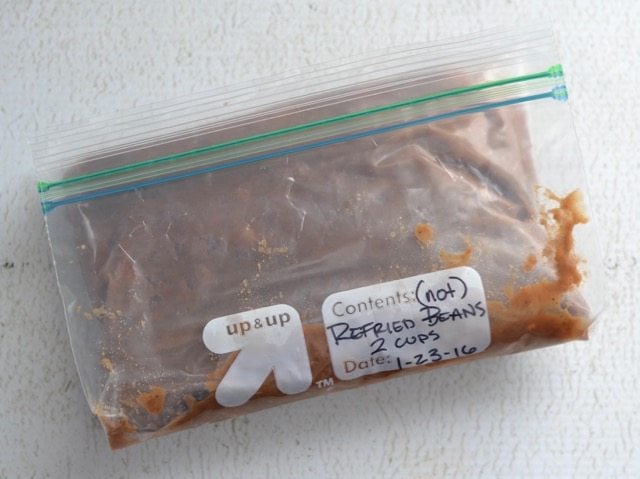
Step 3: Label and Date
And lastly, make sure to label and date the food. Most freezer bags come with an area that can be written on with a Sharpie, but good old fashioned masking tape works well, too. You’ll find rolls of masking tape in just about every commercial kitchen where it is critical to label and date every food item.
Guides for Freezing Specific Foods:
- How to Freeze Tomato Paste
- How to Freeze Buttermilk
- How to Freeze Rice
- How to Divide and Freeze Chicken
- How to Freeze Whole Citrus
- How to Freeze Green Onions
Tips for Freezer Success
- Chill the food completely in the refrigerator before freezing. This makes smaller ice crystals and less textural damage to the food.
- For small items (like meatballs, cookie dough, or fruit pieces), freeze while spread out on a baking sheet, then transfer to a freezer bag once solid. This prevents the pieces from clumping.
- Make sure there is room for air to flow in the freezer, which will help maintain proper temperatures.
- Label and date your food. LABEL AND DATE YOUR FOOD.
- Freeze in smaller portions when possible. This makes foods freeze faster and reduces the need to thaw more food than needed.
- “Shop” your freezer on a regular basis to stay on top of your inventory.
Free Downloadable Freezer Chart
I made this cool little chart that you can use to keep track of the leftovers you’ve frozen. This chart will help you eat your leftovers in a timely manner (before they have a chance to get freezer burn) and it will act as an “in your face” reminder of all the delicious food you have ready and waiting to be eaten at home (a take-out deterrent!).
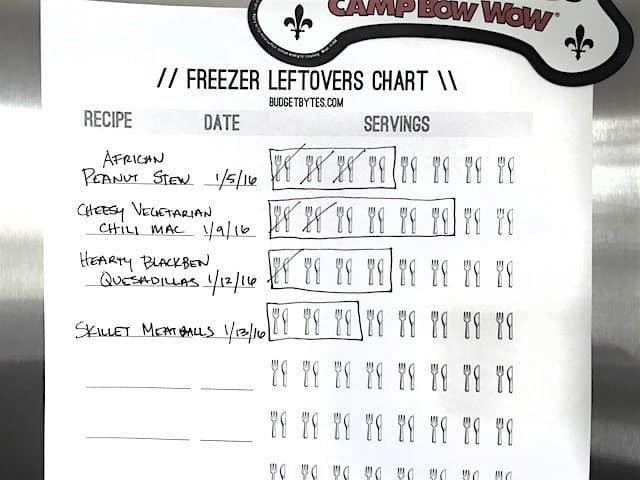
To use this chart, simply write the name of the recipe and the date it was frozen. Next, draw a circle or square around the number of portions that you’ve frozen. Hang the chart on your fridge and every time you eat a portion, simply cross one of the portions off. Now you have a quick visual reference of your frozen meals, without having to rummage through the freezer or get numb finger tips!
**Click Here – Free Printable Freezer Chart**
How to Thaw Frozen Food
Thawing, like freezing, is often food specific. The safest way to thaw is to simply plan ahead and transfer the food to the refrigerator one day ahead. This will keep the food within a safe temperature (below 40ºF) while still allowing the food to slowly thaw.
For leftovers of cooked food (like my soups, stews, rice or pasta dishes), I often just reheat them in the microwave straight from the freezer with no thawing.
Bread, pastries, and other baked goods that are normally stored at room temperature can be thawed at room temperature. Because of the light, airy texture of bread, it thaws very quickly at room temperature, or can be placed straight into the toaster from the freezer.
If you have frozen soups, sauces, or other liquid substances in a freezer bag, simply cut the bag away and place the frozen block into a sauce pot. Reheat the liquid over low heat with a lid (to prevent dehydration), while stirring often.
Here is more comprehensive information on thawing frozen foods:
- Thawing and Preparing Food for Serving
- 5 Ways to Safely Thaw Frozen Foods
- Thawing Frozen Foods
- The Big Thaw: Safe Defrosting Methods for Consumers
The Takeaway
Freezing leftover food and ingredients can save you a LOT of cash (and hard work), so it’s worth learning how to do and getting comfortable with the process, but there is a learning curve. When in doubt, throw it out. A medical bill is almost always going to be more expensive than the few dollars you saved by not throwing away that questionable food. ;)
Feel free to share your favorite foods or ingredients to freeze in the comments below, as well as any online resources that you find helpful.
This is good and really nice post. i love it.
Hi Beth! Great tips! I have taken to freezing more things based on your post (tomato paste, whole citrus). In the midst of this pandemic, I have been wanting to try to grocery shop two weeks at a time, but struggling with how to still get fresh veggies (frozen veggies by themselves always taste, well, frozen to me). Would you be able to make a post with how to freeze fresh veggies (ex: broccoli, carrot, green beans, etc.). It would also be great heading into farmers market season where we can get delicious stuff cheaply! Thank you so much! I love your blog!
Unfortunately I don’t do much freezing of fresh foods, so I don’t have a lot of expertise in that area. I know that for a lot of different fresh vegetables you’ll want to blanch them briefly first to deactivate enzymes that can cause discoloration and spoilage. And then most of the time you’ll want to freeze them flat on a baking sheet first, so they don’t get frozen into one big lump, before transferring to a freezer bag. :) But despite the fact that I don’t have any tutorials written, I’m sure there are probably some out there! Give it a quick Google and I’m sure you’ll find some good resources. :)
Actually you CAN freeze tomatoes (at least romas) in their natural state. I bring them in from the garden and wash them then put them just like they are into a freezer bag. When you need them run them under warm water while still frozen and the skin comes right off. They are then the same as canned and ready for soups and stews or sauces.
Awesome!!
I really appreciate your wonderful explanation. This tip is really useful.
Thanks.
When thawing breads, buns, and rolls I always place them in a plastic bag to keep the moisture in. The bag doesn’t need to be sealed, and I can take the bread out early enough that it will be thawed without worrying about it drying out.
I was freezing multiple meals. The problem was i kept getting ice crystals and freezer burn. I would end up throwing it away. I did find the solution. I got a vacuum sealer. Now, the meals i save are as good as the day i made them. To heat up i put the bag is boiling water. The vacuum sealer is one of the best investments I’ve made.
Can you freeze lefover sechuan chicken ? mine has onion , garlic ,chopped eggplant , one toamto and zucchini. Sauce is out of vinnegar , sugar , soy sauce an water . I also added msg powder and flower
Thank you! This was so helpful. We starting our meal prep journey on a budget. Perfect site to learn new things.
Great post! Such useful information. These guidelines will come in handy.
Beth,
Thank you so much for this wonderful collection of freezing information. At 86, I prepare big pots and the slow cooker full of
soups, chili, stews, etc. and there is only me to feed. So I am into freezing.
Thank you again.
My boyfriend always makes a ridiculous amount of burrito sauce that ends up being N tossed. Is it possible to freeze the leftover sauce, then?
Hmm, I’m not sure. I’d need to see the recipe for the burrito sauce.
Cannot wait to get home (I’m at work and it’s quiet today!) and download the freezer inventory list! No more frozen fingers as I dig, dig, dig to find out how many servings of frozen soup I have left! I used to keep a basic lined paper list on the freezer door, but it always seemed so ugly.
FWIW, I freeze my individual portions of soups and stews in mason jars. In several years of doing this, I’ve only lost one serving to jar breakage…. probably because they got clonked together. I can grab a jar from the freezer at night and pop it into the fridge for lunch the next day. I bring it along in my lunch bag to work, heat it and eat it from the jar, and then when I get home the jar (and spoon) go right into the dishwasher. Nothing to hand wash (I don’t put plastic in the dishwasher) and NO trash!
yes great i like it
wow! never knew I could freeze pasta and rice. thanks for the info!
I know some folks don’t like the idea of freezing things in glass, but I freeze sauces, cooked beans, and stock in pint sized, wide mouth jars all the time. Then I don’t get worried about defrosting/ reheating in the microwave like I do with plastic containers. Also, I break the edges of plastic container kids all the time because they get so brittle when frozen. As long as you use wide mouthed jars and leave headspace, you are golden.
I have this completely irrational fear of glass jars jumping out of the freezer when I open the door and smashing my toes. I don’t know where the idea came from, but I can’t get over it! Hahaha… I need to, though. :P