If I haven’t convinced you yet to try no-knead bread, perhaps this post will. These easy little Focaccia Rolls are so good that I’ve had to stash them in my freezer just so that I won’t eat them all up. Sure, they’re just 30 seconds in the microwave away from being warm and delicious again, but at least the freezer has slowed me down a little ;)
Also check out our classic no knead focaccia bread recipe!
No-Knead Focaccia Rolls
 and have an herb infused roll. There are so many possibilities. Run with it!")
All recipes are rigorously tested in our Nashville Test Kitchen to ensure they are easy, affordable, and delicious.
Trade Effort for Time
These Focaccia Rolls are really easy, but they do need to take their sweet time. You’ll need to start them the day before, so plan ahead. Actual hands-on time is probably less than 30 minutes, most of which is dedicated to shaping the dough into the rolls. All of the “work” is done by the yeast as the dough ferments overnight.
Flavor Your Focaccia Rolls
I brushed each roll with olive oil and then sprinkled Italian seasoning on top. I love the texture that the olive oil gave the rolls, but you could certainly make them without if you want. Also, you could mix dry herbs right into the dough (with the other dry ingredients in the beginning) and have an herb-infused roll. There are so many possibilities. Run with it!
Freeze for Later
As I mentioned above, I love freezing these Focaccia Rolls! Just make sure to cool the rolls completely at room temperature to prevent condensation, then place them in a gallon-sized freezer bag, and pop them in the freezer. Then you can just take a couple out at a time to thaw as needed. They thaw quickly at room temperature, or if you want to rewarm them, just wrap them in foil and pop them in a hot oven for a few minutes. Done!
No-Knead Focaccia Rolls
Cost $1.20 recipe / $0.10 serving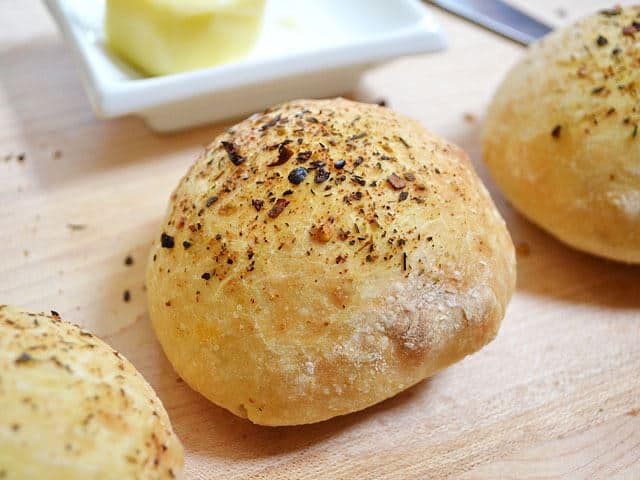
Ingredients
- 4 cups all-purpose flour ($0.59)
- 1/2 Tbsp salt ($0.05)
- 1/4 tsp instant yeast ($0.02)
- 2 cups water ($0.00)
- 2 Tbsp olive oil ($0.24)
- 2 Tbsp Italian seasoning ($0.30)
Video
Instructions
- The day before (about 18 hours ahead of time) combine the flour, salt, and yeast in a large bowl. Stir until well mixed. Add the water, starting with 1.5 cups, and add a little more at a time until the flour forms a cohesive, wet ball. There should not be any dry flour left on the bottom of the bowl. The total amount of water you’ll need will vary, but should be between 1.5 to 2 cups. See the photos below for more info.
- Loosely cover the bowl with plastic wrap and let it sit at room temperature for 16-18 hours to ferment.
- After 16-18 hours, the dough will look like a large, bubbly mass. Sprinkle with enough flour to be able to scrape it out of the bowl without it sticking to your hands. Place the dough on a well floured surface. Cut the dough into 12 pieces. Shape each piece into a small ball. The dough will be quite wet, floppy, and sticky, so sprinkle liberally with flour as you work.
- Place the rolls on a baking sheet covered in foil and lightly sprayed with non-stick spray (I used two baking sheets). Brush the top of each lightly with olive oil. Sprinkle the Italian seasoning over top. Let rise for 30 minutes to one hour or until doubled in size.
- While the rolls are still rising, preheat the oven to 425 degrees. Once it is fully preheated, place the rolls in the oven and bake until the surface is a light golden brown (about 25 minutes). Serve warm!
See how we calculate recipe costs here.
Nutrition Information
Scroll down for the step by step photos!
 and have an herb infused roll. There are so many possibilities. Run with it!")
How to Make Focaccia Rolls – Step By Step Photos
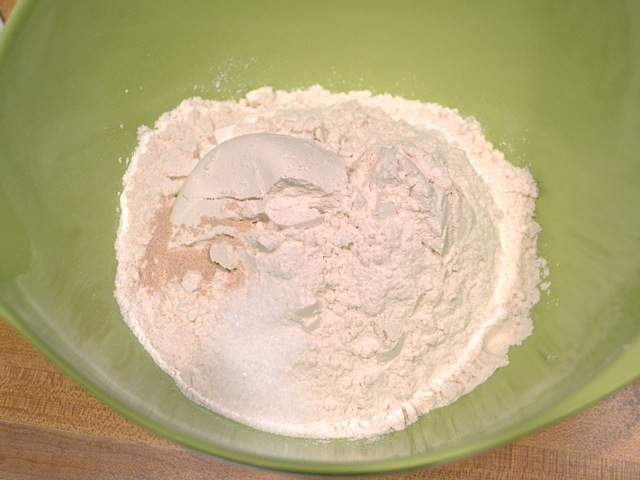
Begin a day ahead of time by stirring together the flour, salt, and yeast.

Starting with 1.5 cups of water, add just enough to form a wet, sticky ball of dough. There should be no dry flour left on the bottom of the bowl or on the surface of the dough. It is better for the dough to be slightly too wet than too dry at this point.
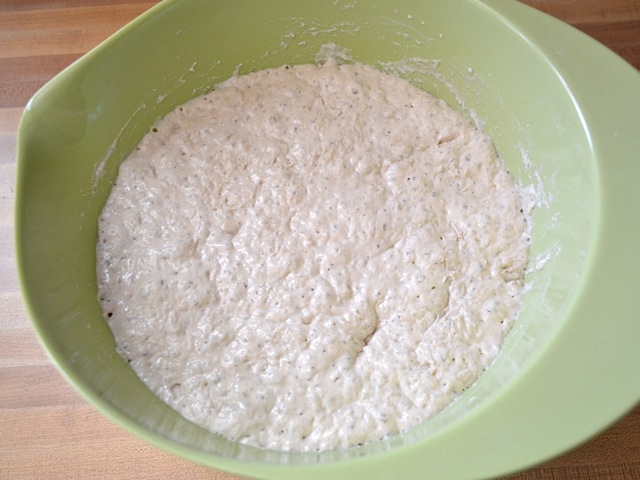
Loosely cover the bowl with plastic wrap and let it sit for 16-18 hours to ferment. After that time, it will have expanded into this big, frothy mass.

Sprinkle the dough liberally with flour so that you can scrape it out of the bowl without it sticking to your hands. Turn the dough out onto a well floured surface. The dough will be very loose, soft, and sticky.
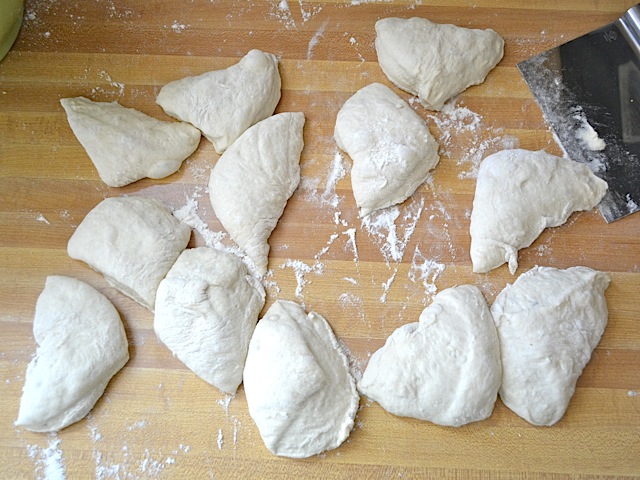
Cut the dough into four equal parts and then cut each quarter into three pieces to yield 12 pieces total.
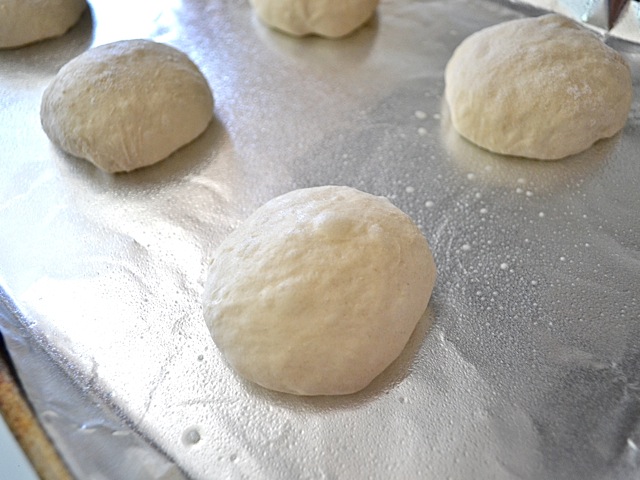
Shape each piece into a ball, sprinkling with flour as you go (the dough will still be quite sticky). Place the balls on a baking sheet covered with foil and lightly coated with non-stick spray.

Lightly brush each roll with olive oil and then sprinkle with Italian seasoning. Let rise for about one hour or, if your kitchen is warm and you’re impatient like me, let rise for 30 minutes.

Towards the end of the rise time, begin to preheat the oven to 425 degrees. Once it is fully preheated, place the rolls in the oven and bake until they are light golden brown on the surface (about 25 minutes). Serve hot!
 and have an herb infused roll. There are so many possibilities. Run with it!")
Terrible recipe. The second rise didn’t happen at all and rolls were flat and crunchy on the bottom. Followed the recipe exactly. I also added sea salt to the top with Italian seasoning. Would have been even more bland without that.
This bread is so delicious . I have been making it for at least 10 -12 years . Whenever I am baking it and my husband walks in , he says : It smells like an Italian bakery in her .
Looks yummy
Fantastic rolls!! I am a little intimidated by home baking, and some of the negative comments didn’t help my confidence, but I really wanted to try this. I am SO glad I did, they came out beautifully! Lovely crusty texture outside, soft and tasty inside. Would be amazing with soup. While the overnight rise part is “time-consuming” it’s still a very simple recipe, was easy for me as a reluctant bread baker, and with such inexpensive ingredients, it’s well worth the little bit of effort. My family loved them, I will definitely make these often. Thank you, Beth!!
Everybody who is complaining about flat rolls, look at the recipe! I think there is an error in the amount of yeast listed. NO WAY is 1/4 tsp enough! I believe the author intended to say 2 1/4 tsp, which is the amount in one packet.
I have made this with one packet and it is excellent.
I’m sure 1/4 tsp is enough. It’s an 18 hour fermentation, so yeast will multiply lots in this time. I’ve made bread with less yeast. Using 2 1/4 tsp for an 18 hour fermentation will probably just overdo it and make a crummy loaf, or rolls in this case. Trust the recipe.
Could this be used for hamburger buns or is it too “hard” of a bread for that purpose? Or are there any recipes on the site that could be used to make buns? I’d love to get away from high priced store-bought preservatives.
I think these would definitely be too tough for hamburgers. We actually don’t have anything at the moment that I think would be good, so we’ll need to add that to our queue! Thanks for the suggestion!
I do use these for hamburger buns and no one (including a denture-wearer) has trouble with them. Maybe worth a try.
What’s wrong with a crusty bun for a hamburger? It would never be an issue for me.
Can I ferment this in the fridge for 72 hours to develop flavor?
Hi Janet, Yes, since refrigeration slows down the fermentation process so much, you can leave it in the refrigerator to ferment for 24-72 hours instead of room temperature for 18. Both methods will produce great flavor, just at different speeds. :)
I made these last weekend without reading the comments…I just made a half portion. I did a big pot of soup this weekend and my husband and I liked them so much the first time, I decided to make a full recipe of these rolls. I then read the comments and was REALLY surprised because they turned out well for me, and I’m not necessarily “good” at rolls. I think I might not have halved the instant yeast when I did the half recipe, so when I made the full one, I doubled the yeast. I also let the dough rise for about 30 hours, just because it worked for my schedule to throw it together Friday morning and to bake them Saturday afternoon.. They turned out perfectly, again. Maybe doubling the instant yeast and increasing the rise time is the key, I don’t know. It was also impressed upon me once that you want your instant yeast to be really new. I only buy it in those little packs of 3 so it gets used before it ages. All I know is that these turned out super well here and I hope those that want to make this will give it a go.
I bake for a living and tried this recipie. The quantities are totally wrong, as is the prove time with no second despite the poolish starter and vague about ‘dusting’ flour edition. Tried this out of curiosity and wish I hadn’t wasted the ingredients! Oven temp is far too high also. Please don’t bother wasting your time. Also far too little yeast …this must be published by someone who hasn’t bake it! Happy onward baking all :-)
Tried the recipe, mine also stayed kinda flat (would not hold it’s ball shape) maybe too much water?
First time trying it so I’ll keep experimenting. 😒
Made this recipe twice. The first time the bottom got really hard as I was waiting for the top to get light golden brown as the recipe states. Was very unsatisfied, but when warming up in microwave on damp paper towel, they got softer and were still pretty good in soup. It was pretty flavorless though.
The second time, I doubled the salt since I was using a courser salt than table salt, I put a heaping tablespoon of italian seasoning inside the dough rather than only putting on top, and I only left it in for about 28 minutes when the bread was still pretty pale. It was amazing! I ate five that day because I couldn’t stop myself. Only thing I’m going to change next time from how I made it the second time is to go with 3/4 T salt rather than 1 T salt. It’s a pity that the bread doesn’t actually come out like the pretty picture, but it tastes amazing and is especially good for dipping in soups so I’m definitely going to make more of this in the future. Maybe I’ll use some whole wheat flour so I don’t feel bad eating it.
So I tried this recipe, but my rolls came out fairly flat. My dough was very sticky as yours looks in the photos. However, when I cut them and shaped them, were very flat. The stayed flat through the second proving and of course baked flat as well. Is there a way to fix this (more or less proving time perhaps or a different temperature as house is about 72 degrees at night)?
It’s hard to say what the problem might be without having been there to watch your process and see the dough in person, but what did your dough look like after fermenting? Was it inflated and very bubbly? It sounds like your yeast didn’t fully activate. What type of yeast did you use? Was the oven fully preheated before you put the rolls in?
I had a similar issue and this is what has worked for me. I noticed they came out flatter when I rolled them in my hand. However, they are rounder and fluffier if I shape them by “tucking” them. Pinch a bit of the dough on top and tuck it to the bottom.
I’ve tried the focaccia rolls twice and the ciabatta once – all failed. It is all well until I put it into rolls. The dough is simply not rising again afterward and I get the most dense “bread/rolls” ever. I’m giving up on the bread recipes (and me wasting flour) . However, all meal/entree recipes that I’ve tried are fantastic!
Just curious if this could work with a 1-1 gluten free flour? Thank you!
We haven’t tested it but you could sure try! *Edited to say that it more than likely will not work in this recipe. You can try another recipe that’s been tested by gluten free focused bakers such as this https://theglutenanddairyfreebakehouse.com/2015/08/09/focaccia-rolls/
This is a bad response from the team: the recipe calls for yeast, which only acts/ feeds on wheat flour. If you replace wheat flour with alternative flour, no proofing will happen – the bread will not rise. No point in even trying.
The actual recipe is a decent recipe, other than the fact that there was no mention of ambient temperature: a hot summer night of proofing will be completely different from a cooler season. The former would cause over-proofing during the bulk fermentation stage.
My apologies John. You are correct. There are a lot of families who do want to try gluten free alternatives. I’ll correct my original response.
Have gotten rave review about these buns and am making these for the third time! I wanted to share some things that worked for me. I know nothing about the different types of yeast, and since the yeast in my fridge has been in there since about 2012, I was skeptical that it had any life left in it. I put the yeast with 1/4 teaspoon of sugar in about a cup of warm water (as another commenter suggested) for a few minutes while measuring everything else out and it worked splendidly.
I found that the All-Purpose Garlic Herb Seasoning (minus the salt and pepper) makes a fantastic topping, though as per usual I go heavier than suggested on the garlic.
As another commenter mentioned, I had trouble with the first batch burning on the bottom when following the baking methods exactly (a microplane was helpful in removing the bottommost burnt layer and also a chunk of my pinky skin). The second time I attempted this recipe I used my pizza stone and made them in batches of 4 for the suggested time and temperature and they came out perfect. No black bottoms!