
As I mentioned in my recipe for Maple Brown Butter Mashed Sweet Potatoes, using brown butter is like taking a magic wand to your recipe and adding that special je ne sais quoi that takes it from good to spectacular. And the best part is that it doesn’t require any fancy tools or special ingredients. Just the regular butter you have in your fridge plus a few minutes in a skillet and you have a deliciously deep, nutty butter that you won’t be able to get enough of.

All recipes are rigorously tested in our Nashville Test Kitchen to ensure they are easy, affordable, and delicious.
I wanted to do a separate tutorial on how to make brown butter so that you can get all the details and see just how easy it is. Plus, I’ve got a few suggestions on how to use your brown butter to get your creative wheels spinning. Seriously, you can add it to just about anything. Since I’m just getting started on my brown butter journey, here are a few excellent examples of how to use brown butter from other bloggers:
- Add it to cookies (Vanilla Brown Butter Pecan Cookies, Caramel Stuffed Brown Sugar Cookies)
- Use it in Cherry Blondies
- Use it as an easy sauce for pasta (Ravioli with Sage Brown Butter Sauce)
- Drizzle over vegetables (Brown Butter Garlic Honey Roasted Carrots, 15 Minute Balsamic Brown Butter Roasted Asparagus)
- Use it in pasta sauces (Brown Butter Pumpkin Fettuccine Alfredo)
- Drizzle over seafood or meat (Brown Butter Honey Garlic Scallops)
- Use in other baked goods (Brown Butter Apple Pie Scones)
Now read back over that list but skip the “brown butter” in the description. Not nearly as amazing sounding, right? I’m telling you, brown butter makes a recipe.
The process is incredibly simple, so let’s go!
How to Make Brown Butter – Step by Step Photos
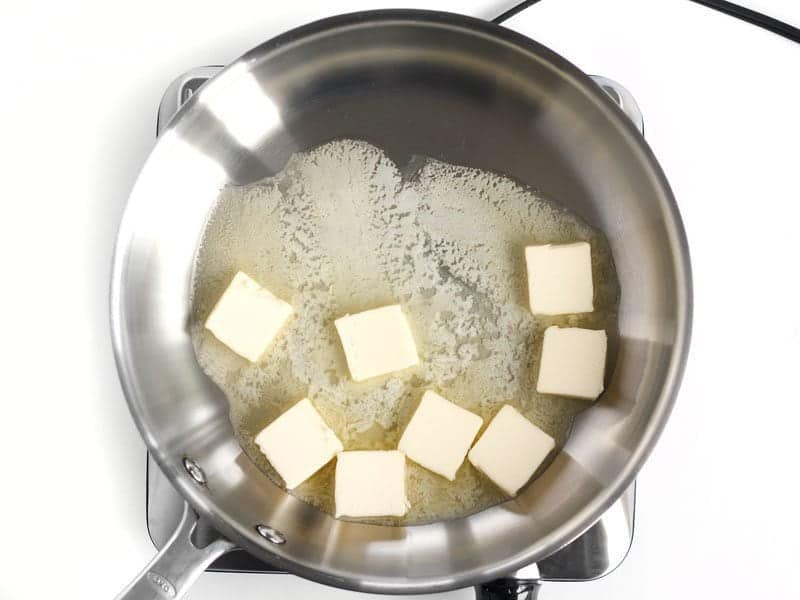
Start by adding several pats of butter to a light-colored skillet. Avoid dark surfaces, like cast iron or teflon because it’s hard to see the butter change color. Try to cut the butter into equal sized pieces so they melt at an equal rate. Heat the butter over medium-low heat. You can use salted or unsalted butter, depending on your need. Just be aware that salted butter will taste slightly more salty once finished. And it’s never a bad idea to brown a little extra, ‘cuz you can totally store it in the fridge and use it on other things.
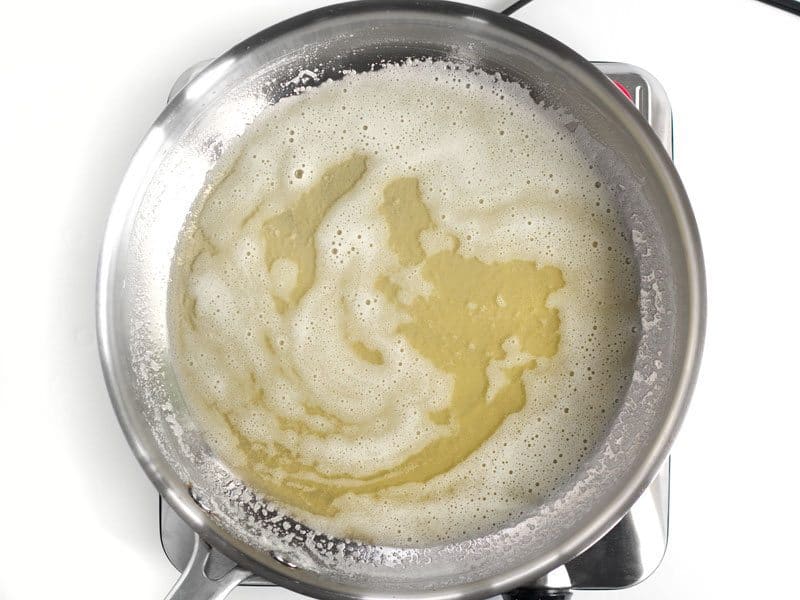
As the butter begins to heat and sizzle it will become foamy. Stir the butter often as it cooks.
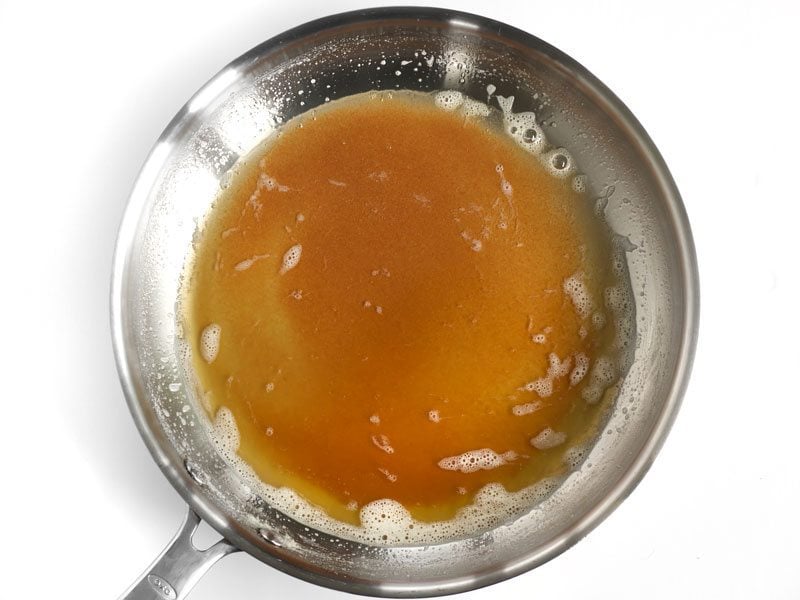
You’ll notice the butter solids (proteins) begin to settle to the bottom of the skillet and after a couple minutes the solids will just begin to get a hint of color. Once you see this slightly golden color, it’s time to pay close attention because they’ll begin to brown quickly. Cooking the butter at a lower temperature slows the browning process down, so I suggest brown butter newbies to go low and slow. If you’re an old pro you can do this over medium heat or maybe even slightly higher and have your brown butter in the blink of an eye.
Because the color develops quickly, you’ll want to stir very often to prevent hot spots from browning the butter unevenly. The foam will also begin to subside as it cooks.
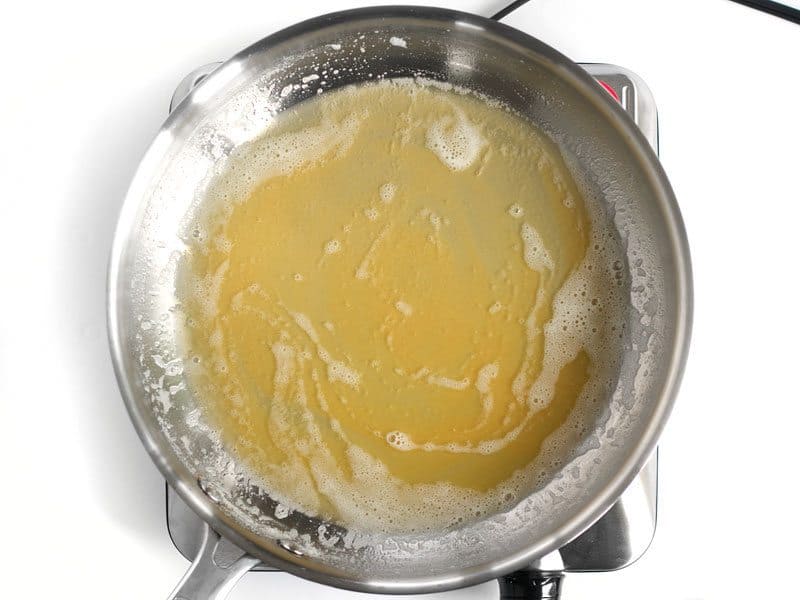
There are different levels of brown butter. Some people like it light, some like it almost black (The French actually have a name for that–beurre noir). Once it gets to this medium brown color you’ll begin to smell the wonderful nuttiness. It smells like a mix between caramel and toasted nuts. YUM! But I want to go a bit further…
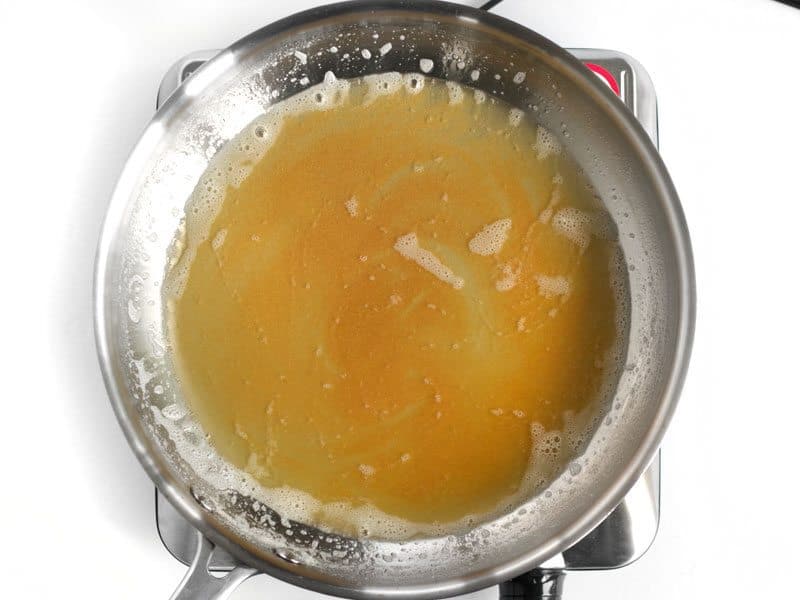
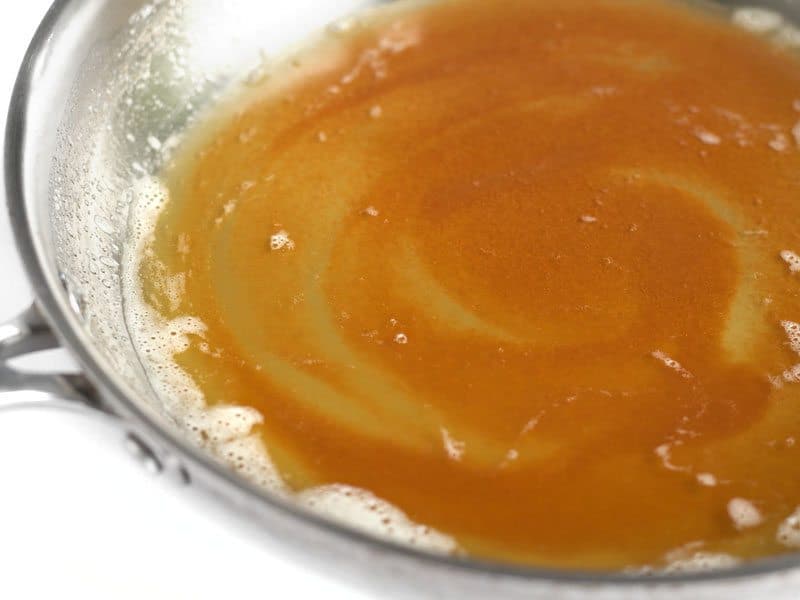
This deep golden color is where I like to stop. Deep, nutty, and rich. The amount of time it takes your butter to get to this point depends entirely on the heat level, but on medium-low it took me about 4-5 minutes. It’s relatively quick either way. Once browned you’ll want to transfer it to another container immediately to prevent the residual heat from the skillet browning it any further.
Now your brown butter is ready to use in all of your favorite baked goods or for drizzling over your favorite foods. Brown butter should not be used for frying or any high-heat cooking as the milk solids will cook further and burn quickly.
What is your favorite way to use brown butter? Let us know in the comments below so we can all hop on the brown butter train!
Glad I found your site.
If you make a lot can it be stored ? If so where and how long ?
You can store brown butter in the fridge for up to 5 days. Place in an air tight container with a piece of plastic wrap or parchment directly on the surface.
Rice Krispie Bars
I put it in my morning coffee! Rich flavor and no sugar!
My foam did not subside, but the liquid was starting to brown so I took off the eat and scraped the foam off. Any idea why the foam didn’t subside? Thanks
As you can see from the step-by-step photos, there will still be some foam once the butter starts to brown and even once it’s done. The bubbles are caused by the water evaporating and the butter won’t really start to brown until the water boils off. You’ve just got to keep stirring (to continue to move the butter solids around so they don’t burn) and trust the process! If the heat is too high, the browning will happen faster than it should, but you can remove the pan from the heat (keep stirring!), turn it down, and then put the pan back on the burner and keep the process going. Rather than gauge by the bubbles, I would lean on the color references instead — as with caramel, you want the butter to be deeply golden brown but not burnt. (If it does burn, transfer it to a heat-safe container immediately, and leave the burnt stuff in the pan and it will be fine!) If you want to skim off the leftover bubbles once it’s cooled, you can, but it isn’t neccessary ~ Marion :)
I fell in love with brown butter at Red Lobster over their salmon. I’m going to make this and store it. How long will it keep in the frudge?
Hi, Becky! While I would not necessarily recommend storing brown butter in the fridge (unless it needs to be cooled, like in Monti’s recent chocolate chip cookie recipe), it will keep for a few days in the fridge or longer if frozen. Instead, I would say to make it fresh each time you want to use it and reduce the amount of butter you brown just to accommodate the recipe and prevent waste. Why? Once butter is melted, it physically changes, and will never return to the same consistency it had in its cold or softened state — the liquids and solids will separate, and it will develop a “grainy” texture, even after browning and removing most of the liquid.
If you do have some leftovers, they will keep in the fridge (max. 5 days) or freezer (1 month):
– Pour the butter into a container and let it cool to room temperature, uncovered (approx. 2 hours)
– Once cooled, stir to mix the butter solids and liquids together
– Cover the container tightly and transfer it immediately to the fridge or freezer
~ Marion :)
My question is this how do you measure once the butter is browned? If a recipe calls for 4T out of 1/2 cup of butter do you measure a liquid T x4?
Hi, Pamela! Great question! You should be fine to measure out what the recipe calls for first, brown the butter, and then transfer it into the mixing bowl. You want to make sure to use a spatula to scrape all the browned bits from the bottom of the skillet (since that’s where all the flavor lives!) And by doing so, you won’t have much that’s left behind. However, if you want to be extra safe, you can add an extra 1/2 tbsp to account for any loss. ~Marion :)
I have cooked/baked for years, seems like ions!! But browning butter I have always been unsure of how long to brown the butter, how high for the temp, etc. For ths firzt time, today, I read your tutorial on Browning the butter for Apple Cinnamon Blondies! They were WONDERFUL!! And the nutty browned butter did make a difference!!
So thank you!!
Dip Jumbo Fried Shrimp in it !
Amazing !!!
Thank you for a great tutorial. I’ve been cooking for years and never had the need to make brown butter until now. (But I have made it by accident on a few occasions.)
This sounds great. Always looking for better tasting food.
But how do you pour the brown butter into another container without pouring the solids as well? What’s the technique or cooking tool needed?
Hi Jean!! You def don’t want to separate the brown solids! That’s where all the flavor is. Keep them in! XOXO -Monti
Your directions say to pour it from the pan into another container and leave the brown solids behind … I think she is asking how to accomplish that
Hi! I checked out the post, and Beth and I talked bout it. The way it was written was confusing. You never want to get rid of the brown caramelized milk solids. It’s where all the flavor is. You should also never cook with brown butter in a pan at high heat, as it has a very low smoke point. It’s best to use it to add flavor to baked goods, or in finishing sauces etc. It truly is magical and it’s one of my favorite ways to add depth to dishes without paying for more spices. Just make sure to keep those solids! XOXO -Monti
My neighbors, who are Mennonite’s and who I get my produce from told me she likes to use Brown butter in her canning jars of green beans.
To be honest I have never heard of brown butter until she mentioned it. So I had to look it up. I am intrigued to say the least. Definitely going to try this.
If you wanted to add an herb (like thyme), when would you recommend adding it to the butter so it infuses it but doesn’t burn the thyme?
Hmm, it’s tough to say without testing it first. I’d probably try adding it into the hot butter after removing it from the heat and just letting it infuse in the butter as it cools first to see how that goes.
Ok….so this isn’t about your food recipes because they are phenomenally delicious….but I gotta say that the ads surrounding your recipes (which I have no idea if you have ever seen them or if you choose them, or if you get paid for them.)
They are kinda nauseous and when I see them and it makes me no longer wanna make your recipe.
The ones that were chosen to be here between the lines of your browned butter recipe were:
1. An ad for dentures showing an open mouth.
2. An ad for a medication to get rid of a rash.
3. An ad for some type of powder to put in a foot bath to remove toxins from the body.
These are pretty disgusting and make me feel like not looking at your website anymore. I’m hoping that you will check into it cause I’m sure I’m not the only person who loves your recipes but hates the repulsive ads.
Thanks for that feedback! No, I hadn’t seen those and I don’t get to choose the individual ads, but I can definitely double check to make sure we have certain categories blocked to prevent that type from showing because I definitely agree that it’s disgusting! 😣