All recipes are rigorously tested in our Nashville Test Kitchen to ensure they are easy, affordable, and delicious.
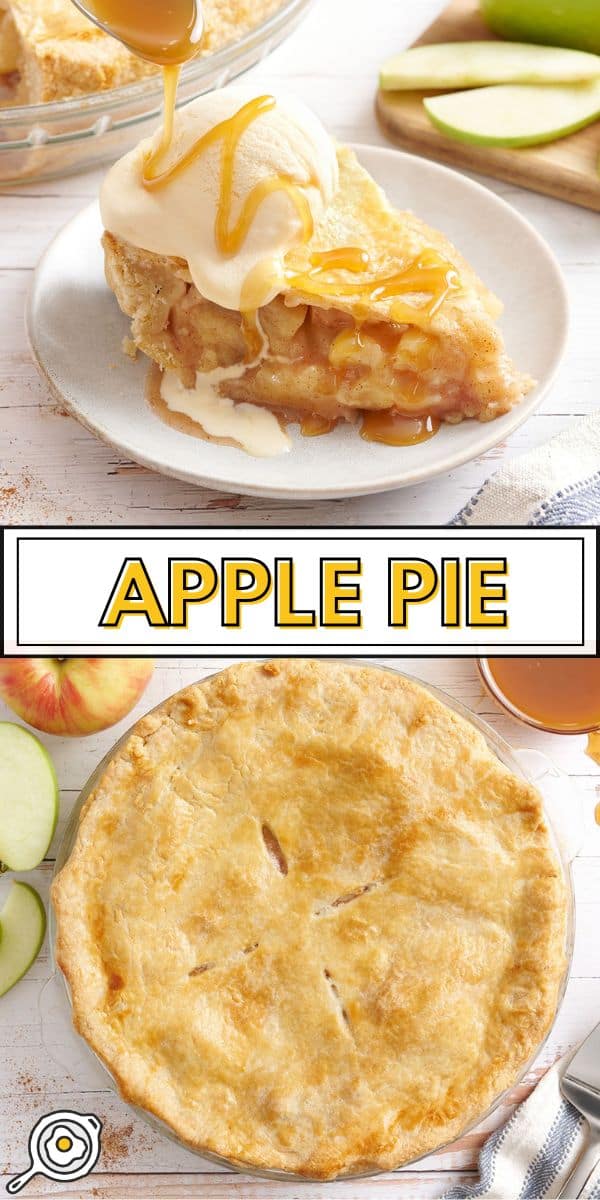
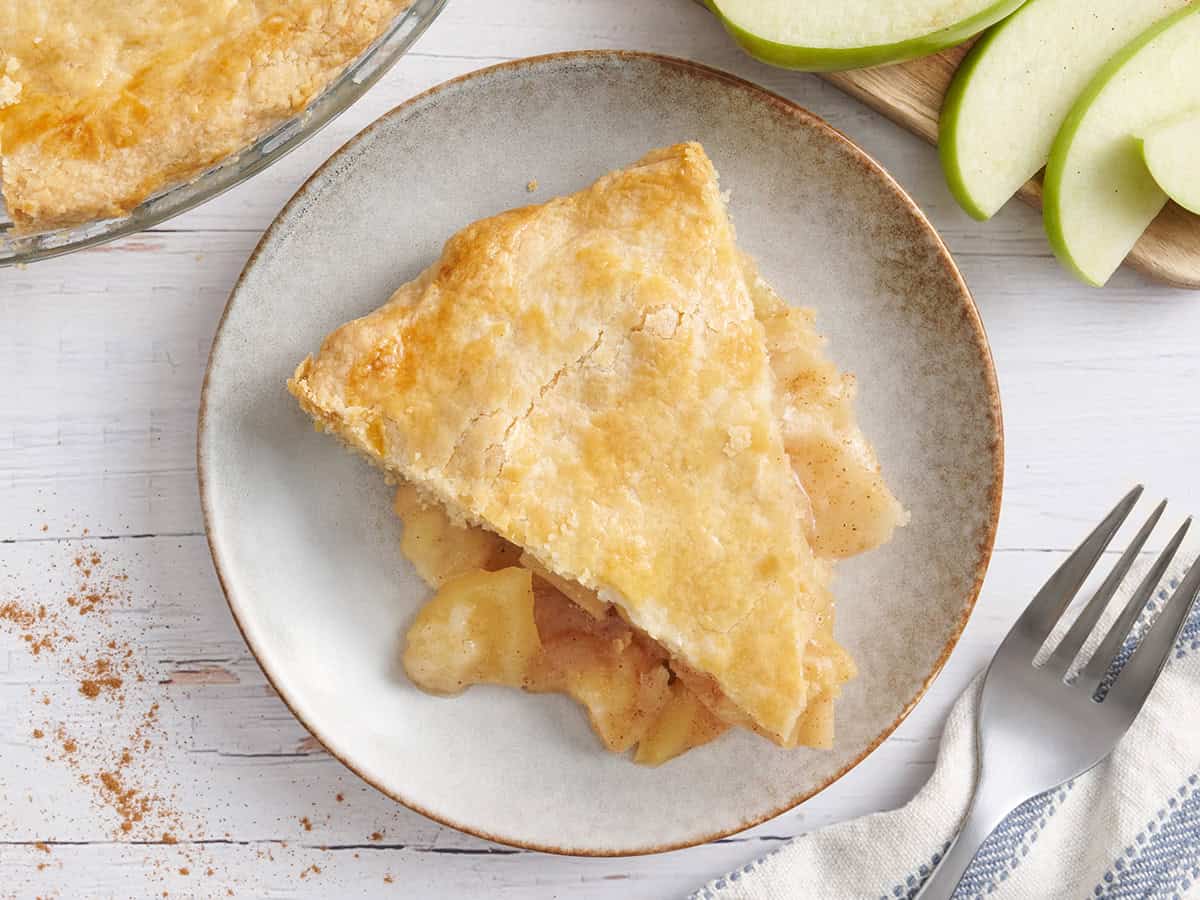
If you’re looking for an apple pie recipe that will make everyone at your table gasp with delight, this is it! The filling is effortless and ridiculously tasty. Seriously, I’ve baked this pie more times than I can keep track of, and it’s the only recipe I always come back to when I want a cozy dessert that really wows. Pair it with my buttery homemade pie crust, and you’ll never go back to store-bought apple pie again. #forserious
“I’ve been making this pie once or twice a year since the recipe came out, and it’s been a hit each and every time! Compliments have included “smells like childhood,” “the best pie I’ve ever had,” and “better than my grandma’s,” so you KNOW it’s something special! Generally I use a mix of Honeycrisp and Golden Delicious Apples, with maybe a Granny Smith or two.”
Rose
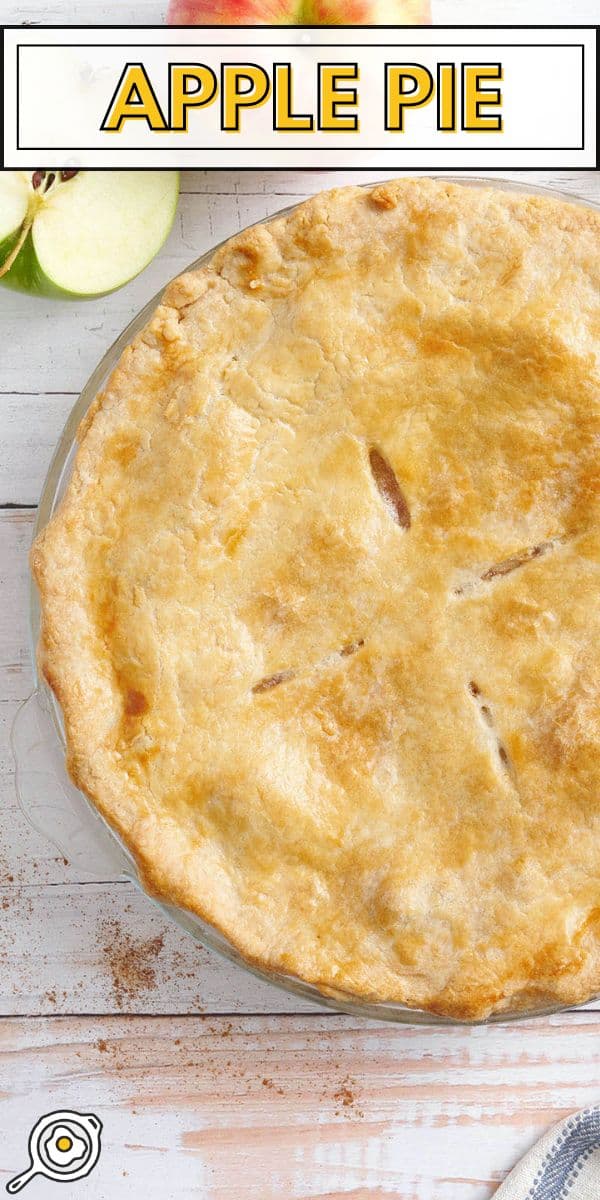
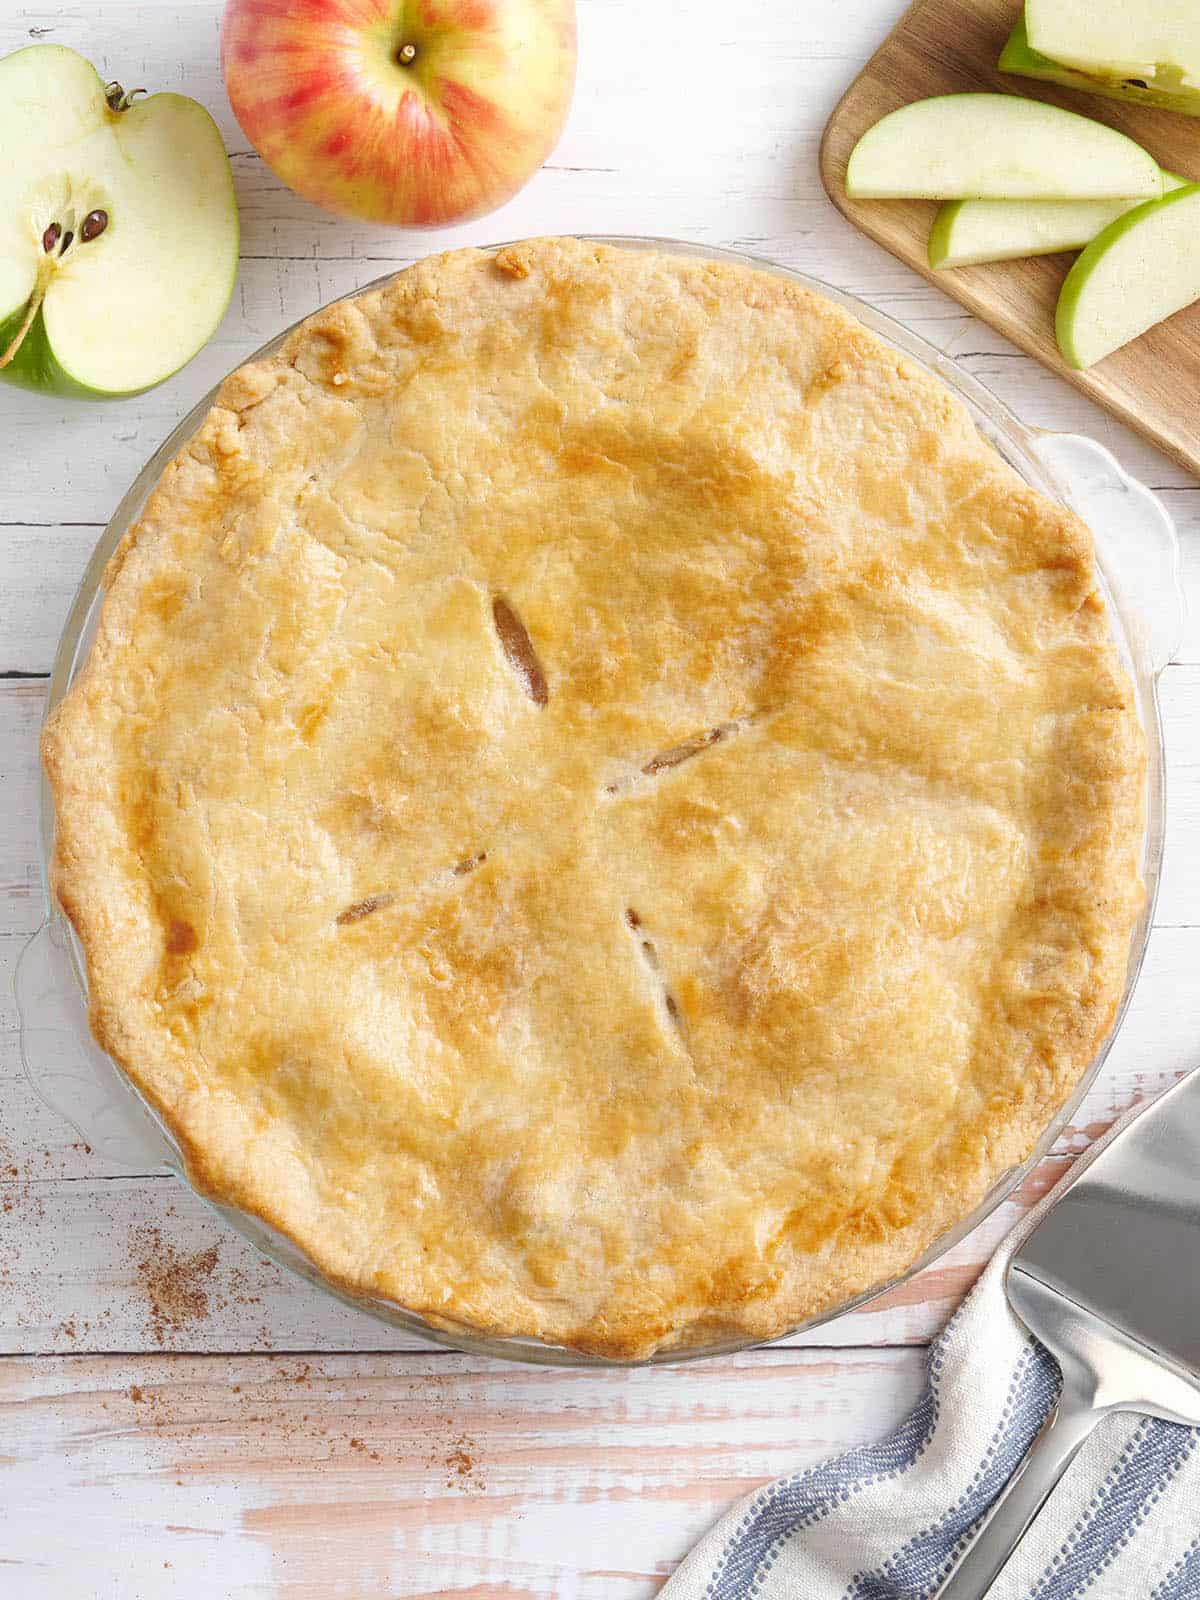
From-Scratch Homemade Apple Pie
A good apple pie is all about balance, and that begins with the crust. I use my 3 ingredient pie crust recipe, which is a hybrid between a mealy and flaky crust. It stays firm enough to stand up to the juicy apple filling (no soggy bottom!) while still baking into buttery, flaky layers.
The filling in this recipe gets an upgrade from your regular store-bought pie, too, since I don’t just toss the apples with sugar and spices and call it a day. I reduce the apple juices into a quick caramel, then stir the apple slices back in until they’re glossy and just softened. It’s one of those small steps that make this homemade apple pie taste truly unforgettable.
Recipe Success Tips
- Use the right apples! I divide the apple display at my grocery store into two sections: great for pie and awful for pie. Apples that are great for pie hold their shape during baking and have complex flavors. I recommend using a combination of Honey Crisp, Granny Smith, Pink Lady, or Golden Delicious. AVOID McIntosh, Fuji, Gala, or Red Delicious for apple pie as they taste one-dimensional and fall apart faster than a reality show housewife (use them to make applesauce instead!) 😉
- This recipe is for a standard pie pan with a volume of 4 cups. But since apples shrink by about 30% of their volume as they bake, you need more fruit than you’d think. I use 6 cups of sliced apples for the filling, which is usually 6 to 8 apples. You may need more or fewer apples depending on their size.
- Slice your apples about 1/4-1/2 inch thick. Any thicker, and they won’t cook through by the time your crust does. Any thinner, and they’ll dissolve and leave you with a soggy bottom crust. Make sure to slice them the same thickness so they cook uniformly!
- Keep the pie crust ingredients COLD! If you’re making my homemade crust (which I highly recommend), you need to keep everything cold. I put all my ingredients and tools in the freezer, and keep individual ingredients chilled when I’m not using them.
Apple Pie
Cost $10.01 recipe / $1.25 per serving
Ingredients
Double Pie Crust*
- 2¾ cups all-purpose flour (350g, plus some for dusting $0.37)
- 2 sticks salted butter (frozen, (1 cup, ½ lb.) $1.98**)
- ½ cup chilled water ($0.00***)
Apple Pie Filling
- 1 large egg (white and yolk separated, $0.25)
- 3 Granny Smith apples (3 cups once sliced, (660g uncut) $2.39)
- 3 Honey Crisp apples (3 cups once sliced, (625g uncut) $4.49)
- 2 Tbsp lemon juice ($0.13)
- ½ cup granulated sugar (115g, $0.22)
- 1 tsp ground cinnamon ($0.06)
- ¼ tsp salt ($0.01)
- 3 Tbsp all-purpose flour ($0.02)
- ⅛ tsp ground nutmeg ($0.01)
- 1 Tbsp heavy cream ($0.08)
Video
Instructions
Homemade Pie Crust Instructions
- Gather and prepare all ingredients. If you're using a store-bought double pie crust, skip to the pie filling directions below.
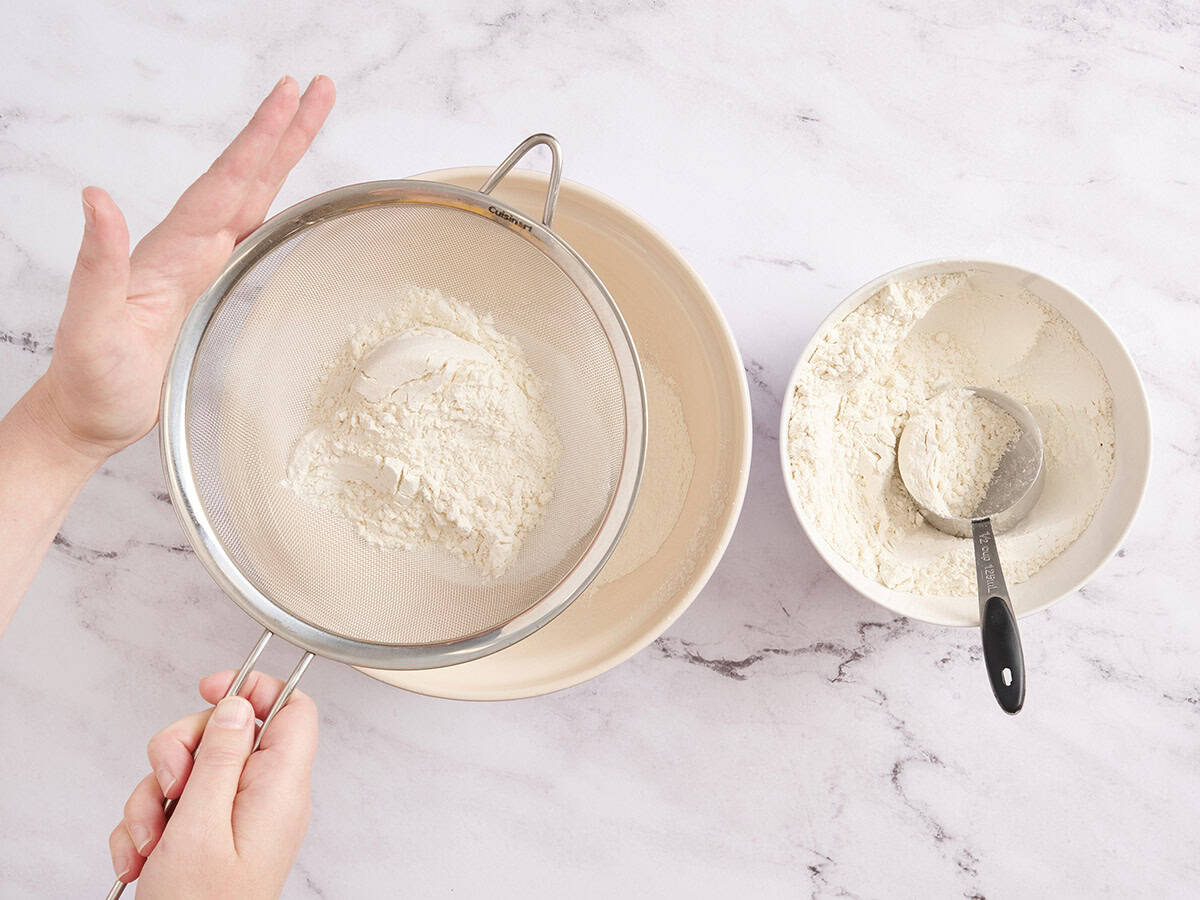
- Sift the flour, then spoon 2¾ cups (350 grams) into measuring cups and level off the extra to avoid a dry crust. Add it to a large bowl and place the bowl of flour in the freezer to chill while you grate the butter.
- Grate the butter sticks on the box grater’s large holes. When the butter becomes difficult to handle, chop the remaining pieces into dice-sized pieces.
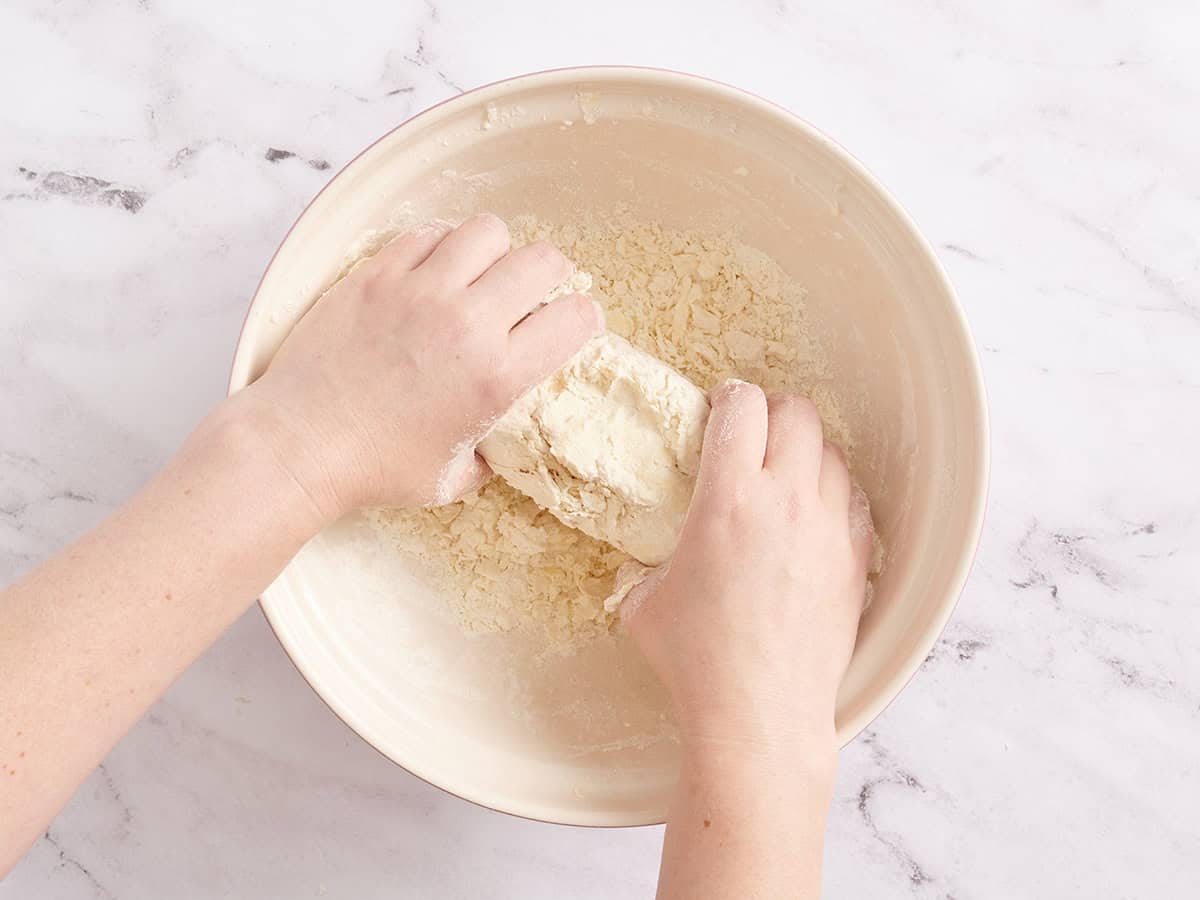
- Add the butter to the flour. Use a spoon to toss the butter and flour. Work quickly until the butter is completely covered in flour and the mixture resembles a shaggy, coarse cornmeal.
- Spoon 4 tablespoons of chilled, icy water onto the flour/butter mixture. Mix quickly with a fork, incorporating the flour that has gathered at the bottom of the bowl.
- Continue to add water tablespoon by tablespoon, mixing between each addition, until you can lightly pinch the flour/butter mixture and it holds together in a dough.
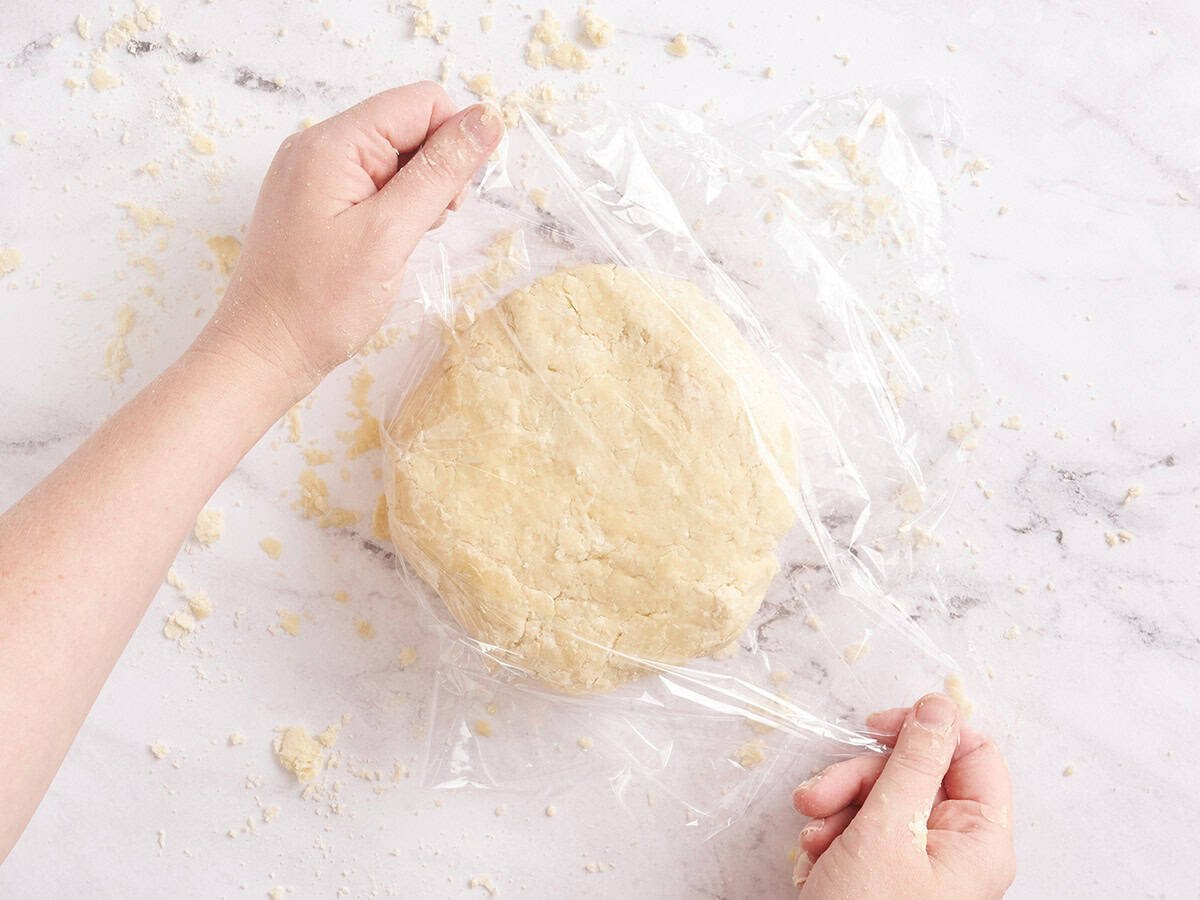
- Quickly press the shaggy dough into a ball, working in the flour. Then shape it into a rough 6-inch disc, 3-4 inches thick, on a lightly floured surface. Don’t overmix, it’s ok to be craggy! Smooth dough means it’s been overworked.
- Wrap the disc of dough tightly in plastic wrap. Let it rest in the fridge for at least two hours, preferably overnight.
- When you’re ready to bake your pie, slice the chilled dough an inch above the center line and shape both halves into a disc.
Pie Filling Instructions
- To make the apple pie, place a rack in the center of your oven, and top it with two stacked sheet trays (you can also use a pizza stone or large cast iron pan). Preheat the oven to 375°F. Roll out your bottom and top pie crusts to 1/4-inch thickness. You might need to let the pie dough sit for 5 minutes at room temperature if it's too stiff to roll out straight from the fridge. Refrigerate the top crust.
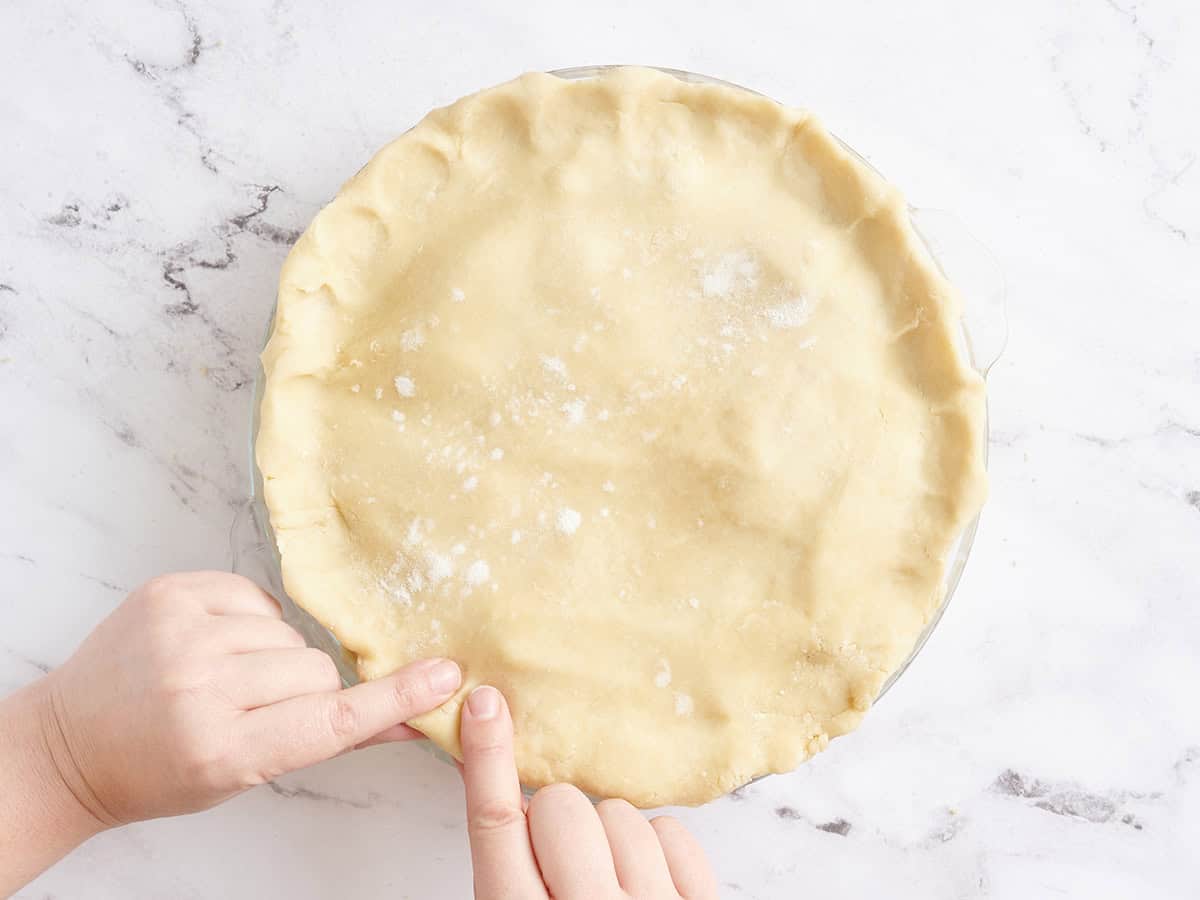
- Separate the egg white and yolk. Line your pie pan with the rolled-out bottom crust. Use a fork to puncture the bottom crust 9 to 10 times. Beat the egg white and brush the bottom crust lightly with it. Refrigerate the crust-lined pie pan.****
- Peel and slice the apples into 1/4-inch-thick slices until you have 6 cups. Then place them in a colander and toss them with lemon juice.
- Place the colander in a large saucepan. Mix the sugar, cinnamon, salt, flour, and nutmeg. Sprinkle the apples with the sugar mixture and incorporate thoroughly.
- Allow the apples to marinate in the sugar and spices for half an hour. They will release their juices into the saucepan.
- Once the apples have released their juices, remove the colander with the apples, and simmer the juices in the pan over medium heat until they reduce into a caramel, about 5 minutes.
- Add the sliced apples to the pan and cook with the caramel until slightly softened, about 5 minutes. Let them cool for about 10 minutes.
- Once the apples have cooled, remove the pie pan and the top crust from the refrigerator. Add the apple slices to the crust-lined pie pan.
- Cover the apples with the top crust. Fold the top crust under the edges of the bottom crust and pinch the crusts together.
- Flute the crusts, then slice steam vents into the top crust. Beat the egg yolk and cream together, and brush the top crust with the egg wash.
- Place the pie pan on top of your sheet trays and bake for 45 minutes, or until the top crust is golden brown and the pie’s juices are bubbling.
- Cool the pie for at least 30 minutes before slicing, but preferably for an hour to allow the filling to solidify.
See how we calculate recipe costs here.
Notes
Nutrition Information
How to Make Apple Pie Step-by-Step Photos
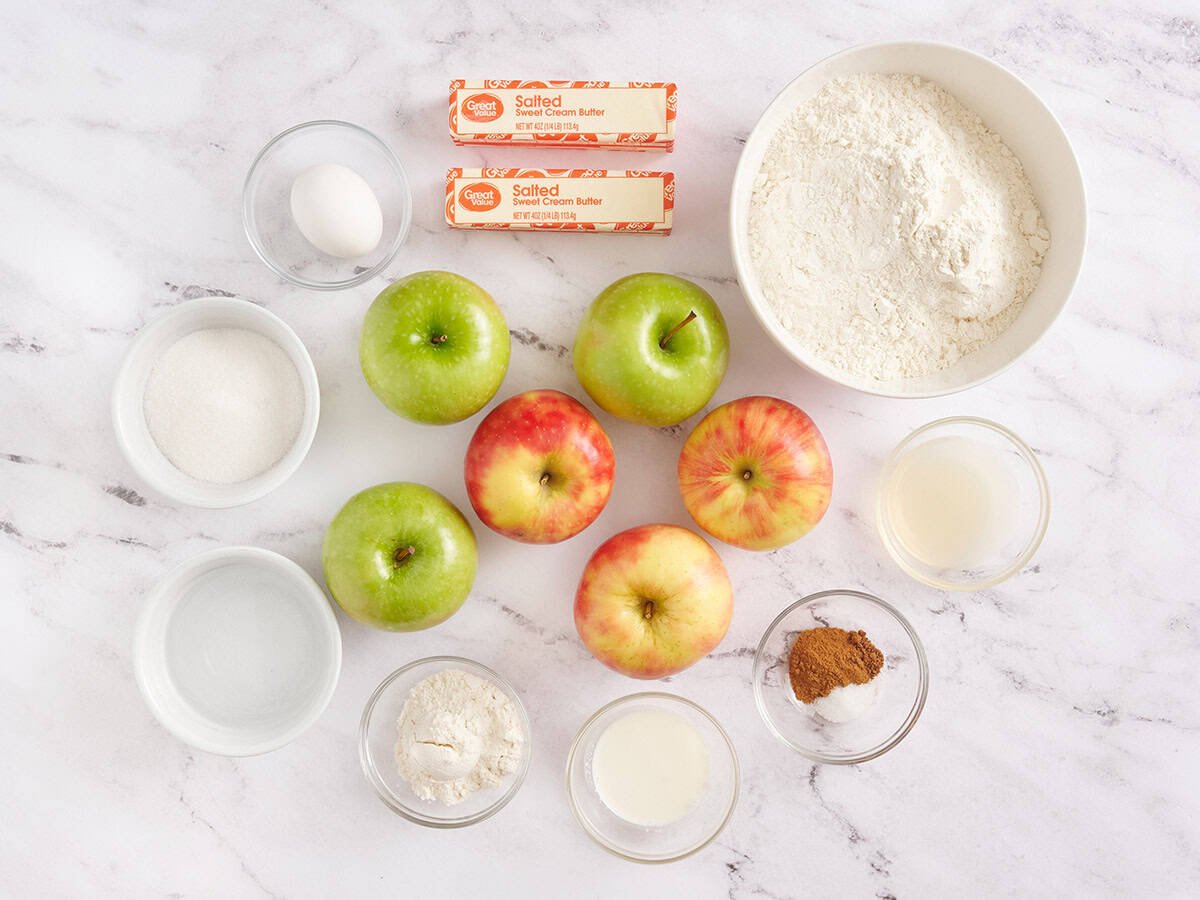
Gather all of your ingredients.
Make the pie crust: If you’re making my homemade pie crust, start by sifting the flour to remove any clumps.
If you’re using a store-bought double crust, skip to step 10 (preheating the oven and rolling out the top and bottom crusts).
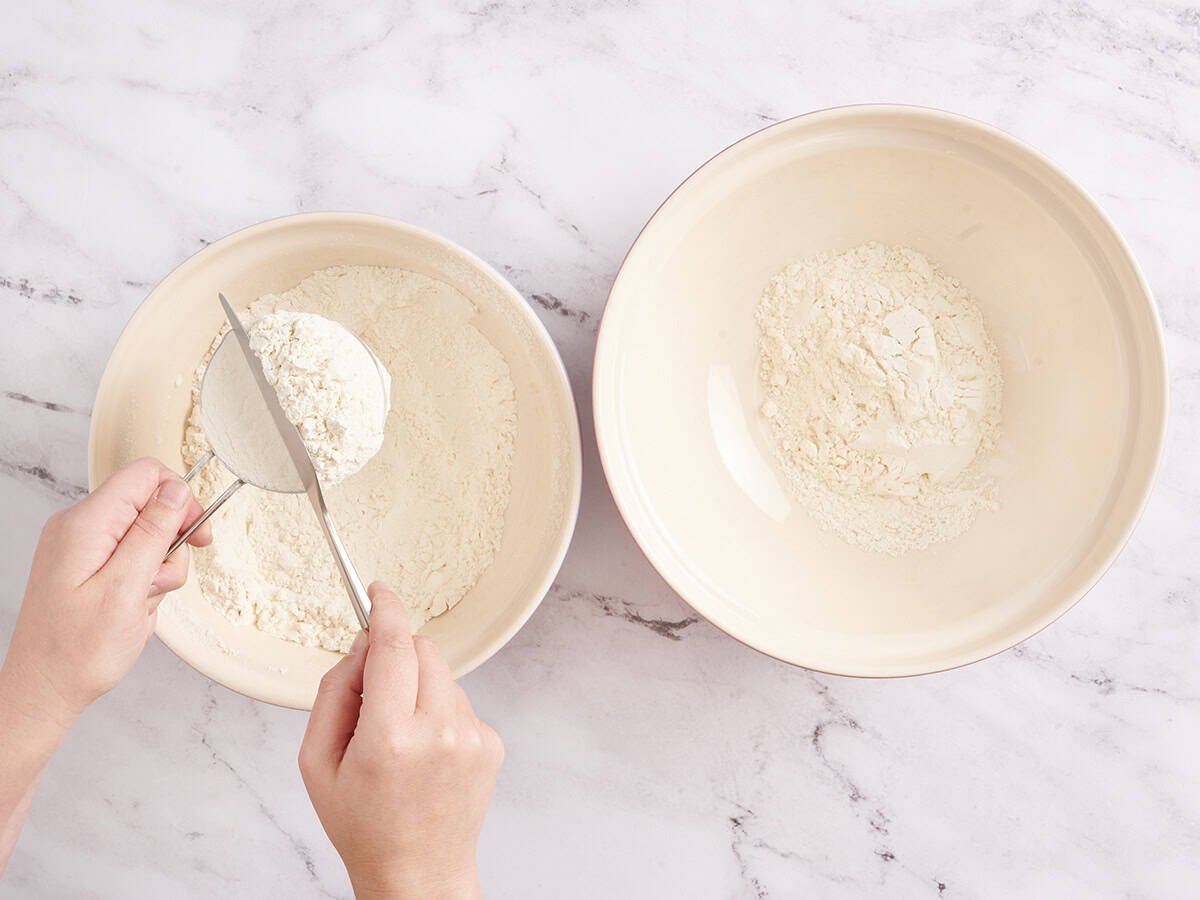
After sifting, spoon 2¾ cups (350 grams) into measuring cups and then level off the top with a knife to avoid accidentally using too much flour, which can make the crust dry. Pop the measured flour into a bowl and place the bowl in the freezer to chill while you prep the butter.

Grate the butter: Grate 2 sticks frozen salted butter using the large holes on a box grater. Once you’ve grated most of the butter and it becomes difficult to handle, I just chop the remaining pieces into a small dice.
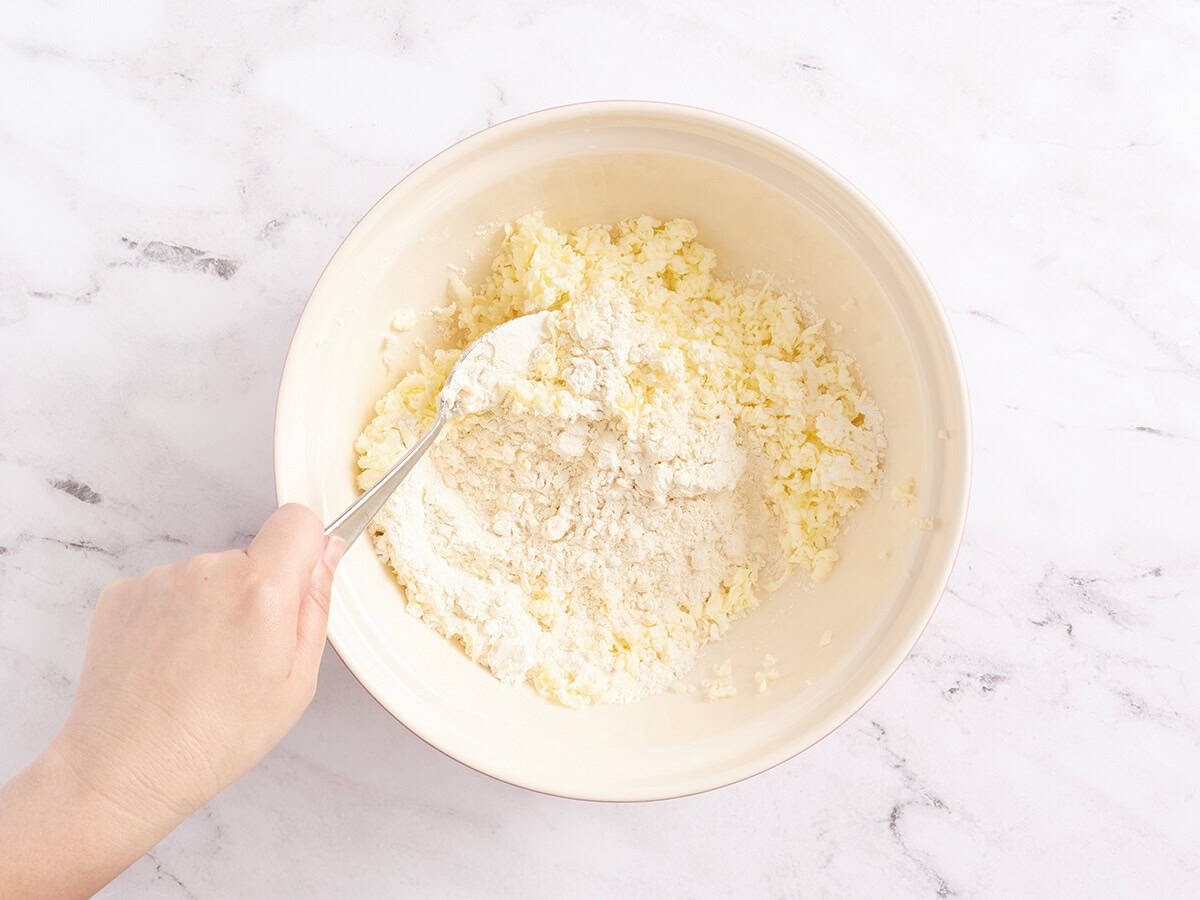
Remove the bowl of flour from the freezer and add the grated butter. Use a spoon (not your hands to avoid warming the butter) to toss the butter and flour together. Be sure to work quickly until the butter is covered in flour and resembles a shaggy, coarse cornmeal.
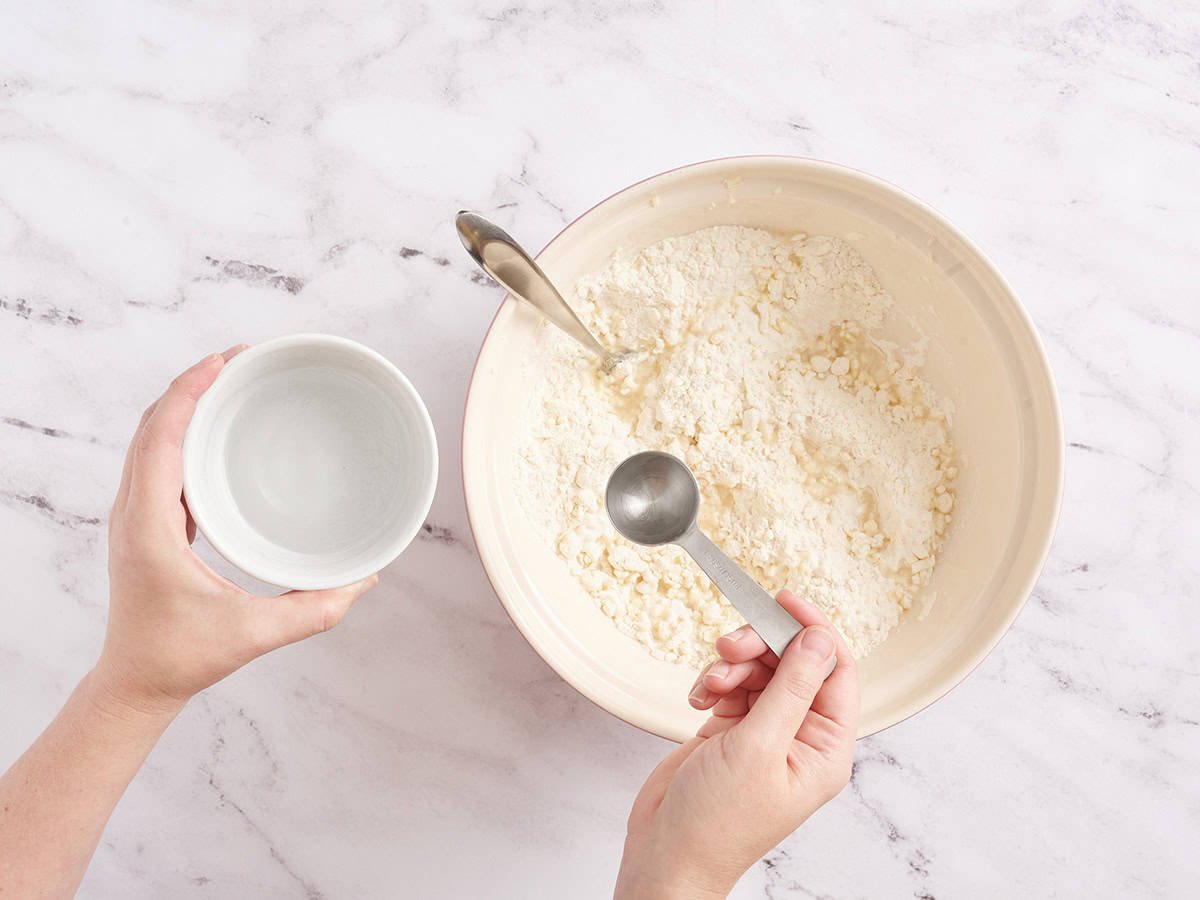
Add 4 Tbsp of chilled, icy water to the butter and flour mixture. Mix quickly with a fork, scraping up the flour that has gathered at the bottom of the bowl.
Keep adding 1 Tbsp of water at a time, mixing between each addition, until you can lightly pinch the flour-butter mix together and it holds in a dough.
Quickly form the shaggy dough into a ball, working in any leftover flour in the bowl. On a lightly floured surface, shape the dough ball into a rough 6-inch disc (3-4 inches thick). Don’t be tempted to overmix! It’s supposed to be a craggy dough at this point. A smooth dough means it’s been overworked.
Wrap the dough disc tightly in plastic wrap and store it in the fridge for at least 2 hours, or ideally overnight.
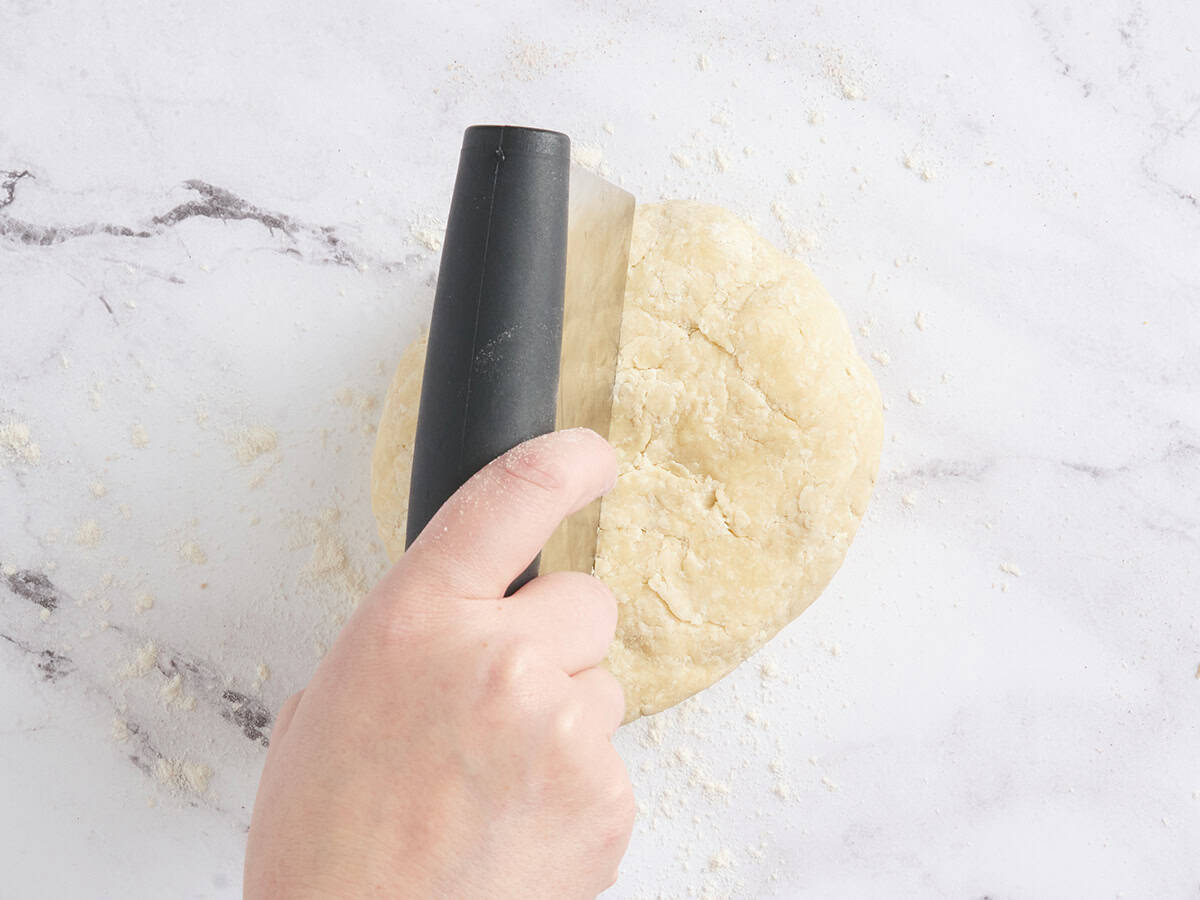
When you’re ready to bake your pie, slice the chilled dough an inch above the center line and shape both halves into a disc.
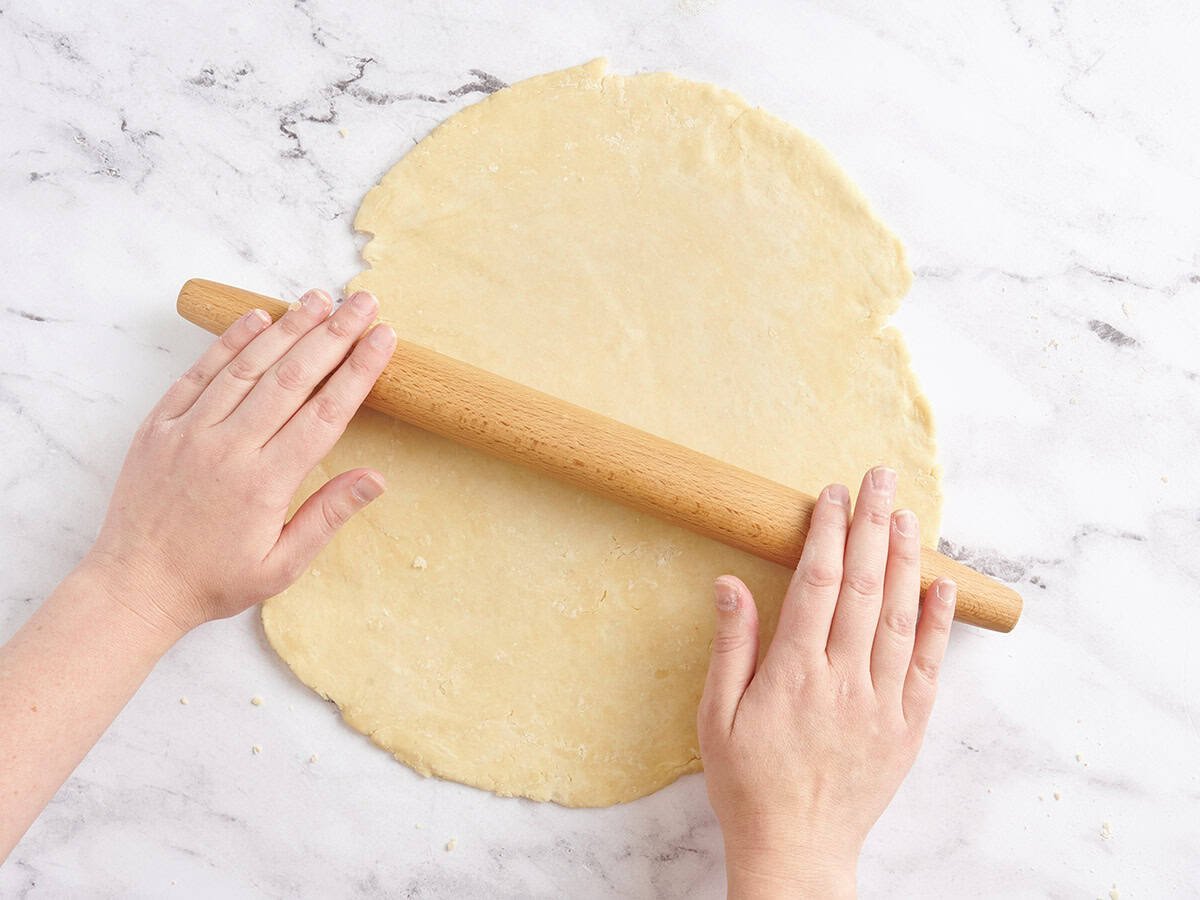
Prep the crusts: Place a rack in the center of your oven, and top it with two stacked sheet trays (or a pizza stone or large cast iron pan). Preheat the oven to 375°F. Roll out your bottom and top pie crusts to 1/4 inch thickness (you might need to let the pie dough sit for 5 minutes at room temperature if it’s too stiff to roll out straight from the fridge). Place the rolled out top crust into the fridge for now.
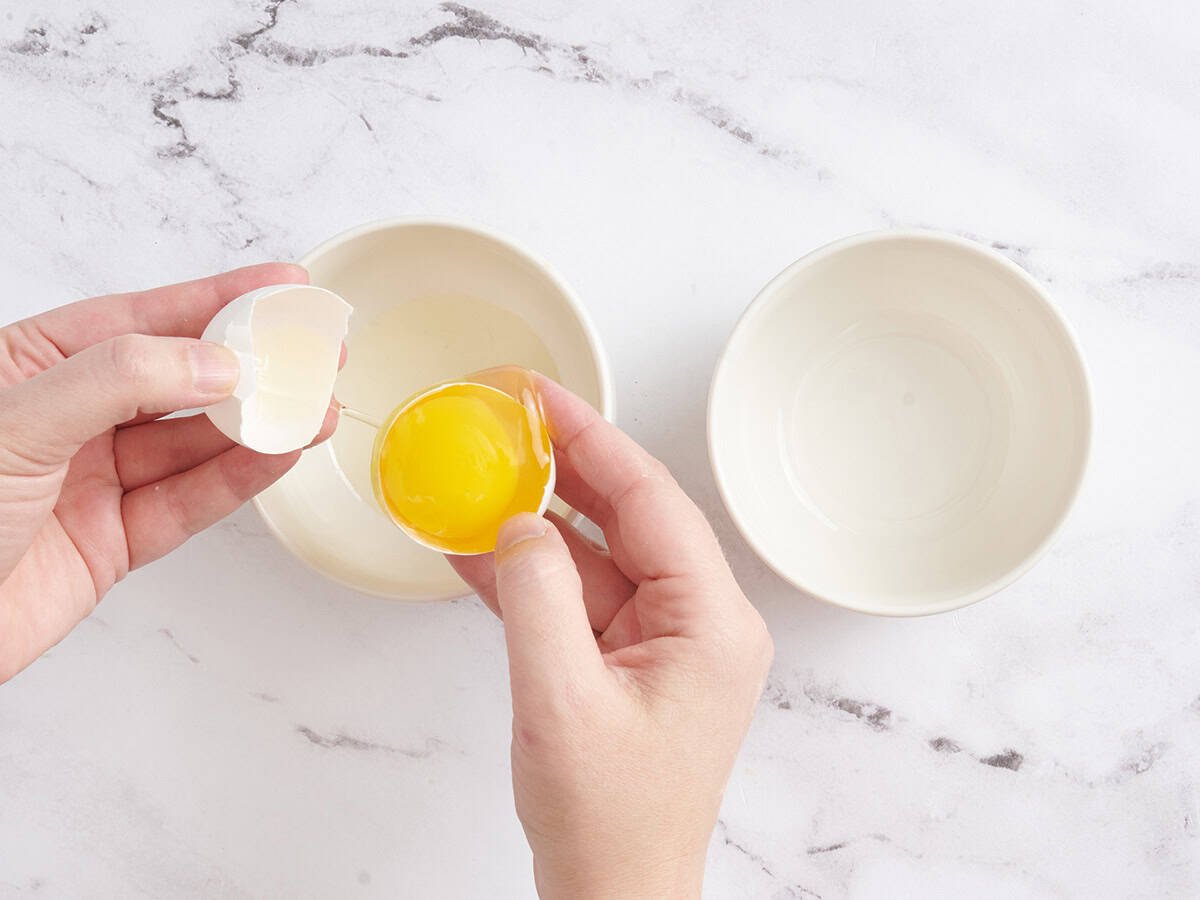
Brush the pie crust: Separate the egg yolk and white from 1 large egg, and line your pie pan with the rolled-out bottom crust. Puncture the bottom crust with a fork 9-10 times. Place the egg yolk to one side.

Beat the egg white and brush the bottom crust with a very thin layer of egg white. Place the bottom-crust-lined pan in the fridge while you make the filling.
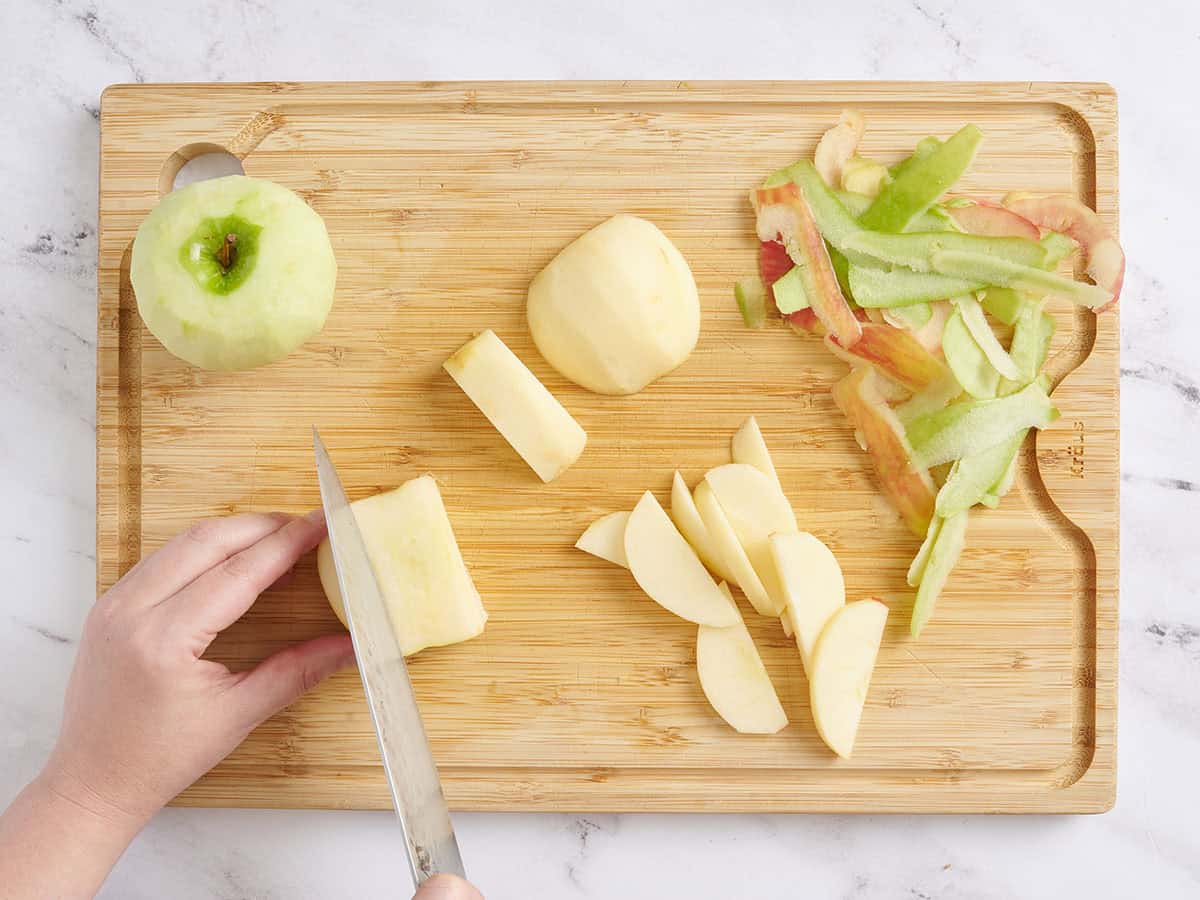
Slice the apples: Peel 3 Granny Smith apples and 3 Honey Crisp apples. Then slice them into 1/4-inch-thick slices until you have 6 cups total.
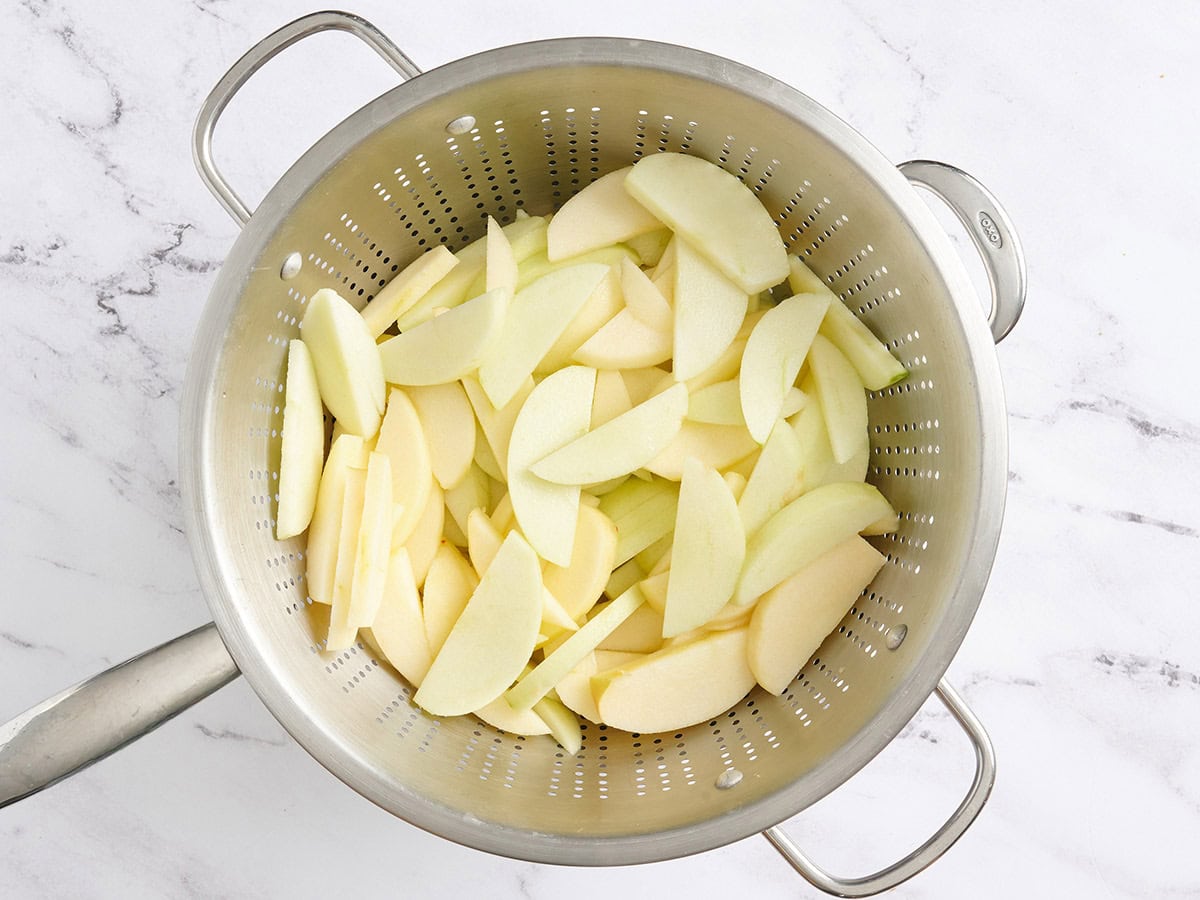
Place a colander over a large saucepan. Add the 6 cups of sliced apples to the colander and toss them with 2 Tbsp lemon juice.
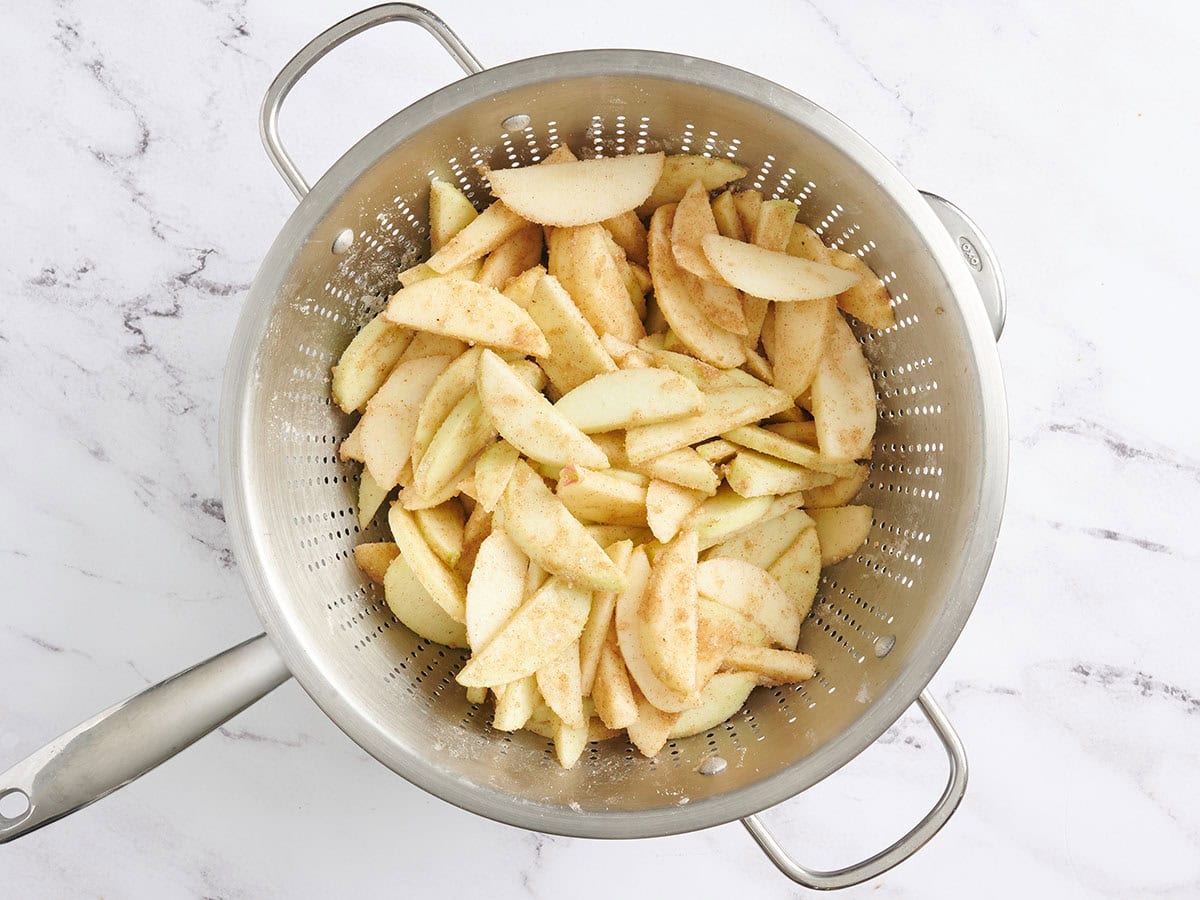
Marinate the apples: Mix the ½ cup granulated sugar, 1 tsp cinnamon, ¼ tsp salt, 3 Tbsp flour, and ⅛ tsp nutmeg together in a small bowl. Sprinkle the apples with the sugar mixture and incorporate thoroughly.
Let the apples marinate in the sugar and spices for half an hour. They will release their juices into the saucepan under the colander.
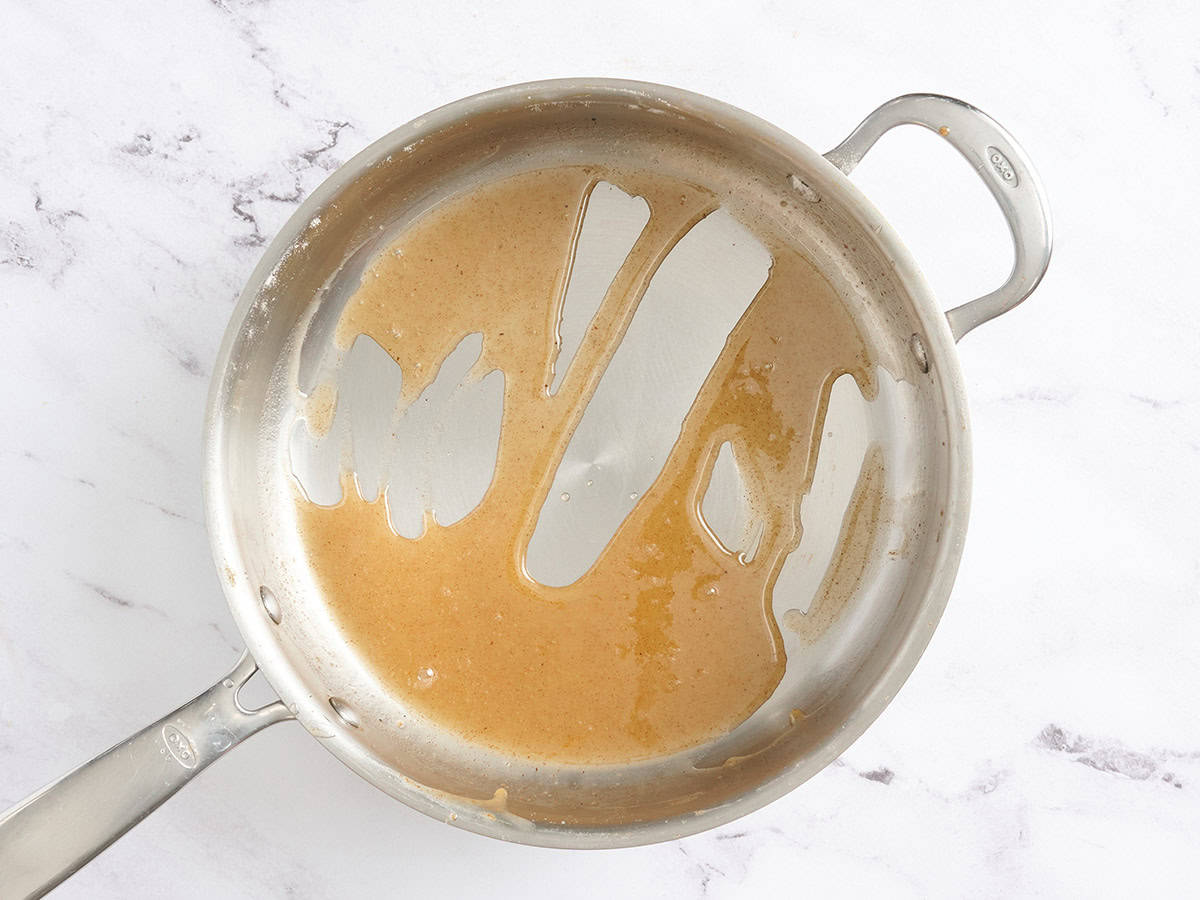
Make the apple caramel sauce: After the apples have released their juices into the pan, remove the colander and the apples and place the pan with the juices over medium heat. Cook down the apple juices until a caramel forms, about 5 minutes.
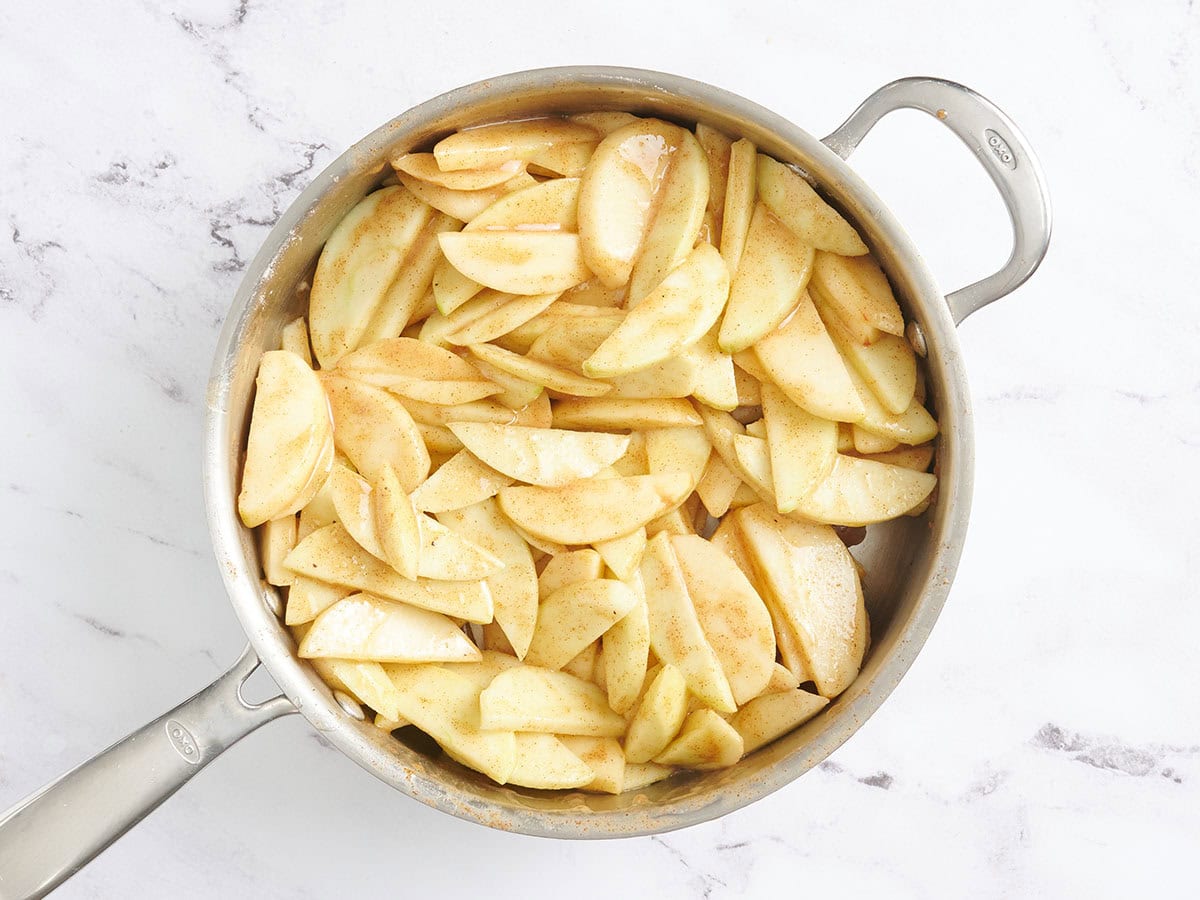
Make the filling: Add the sliced apples to the pan and cook with the caramel until slightly softened, about 5 more minutes. Remove the pans from the heat and let the apples cool for about 10 minutes.
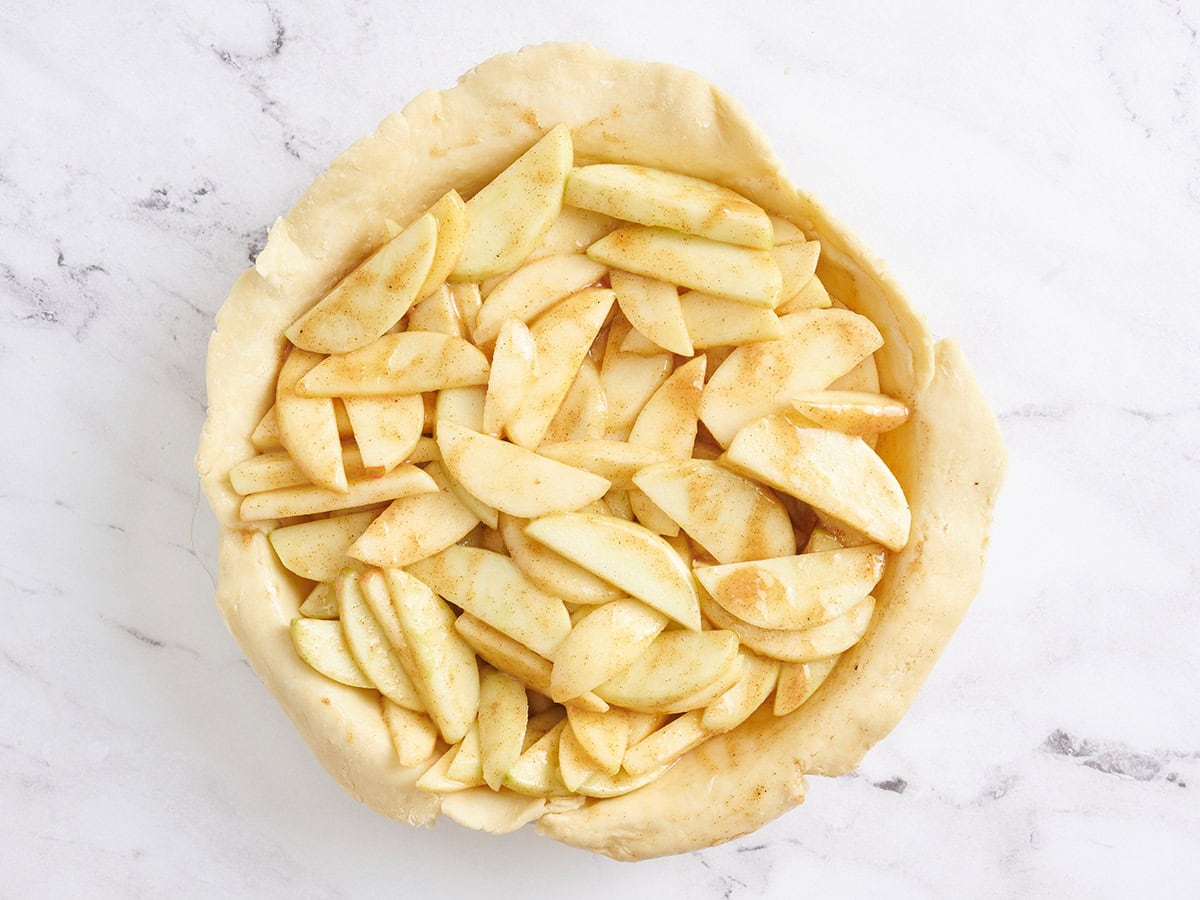
Assemble the pie: When the apples have cooled for 10 minutes, remove the pie pan and the top crust from the refrigerator. Pour the softened apple slices into the crust-lined pie pan.
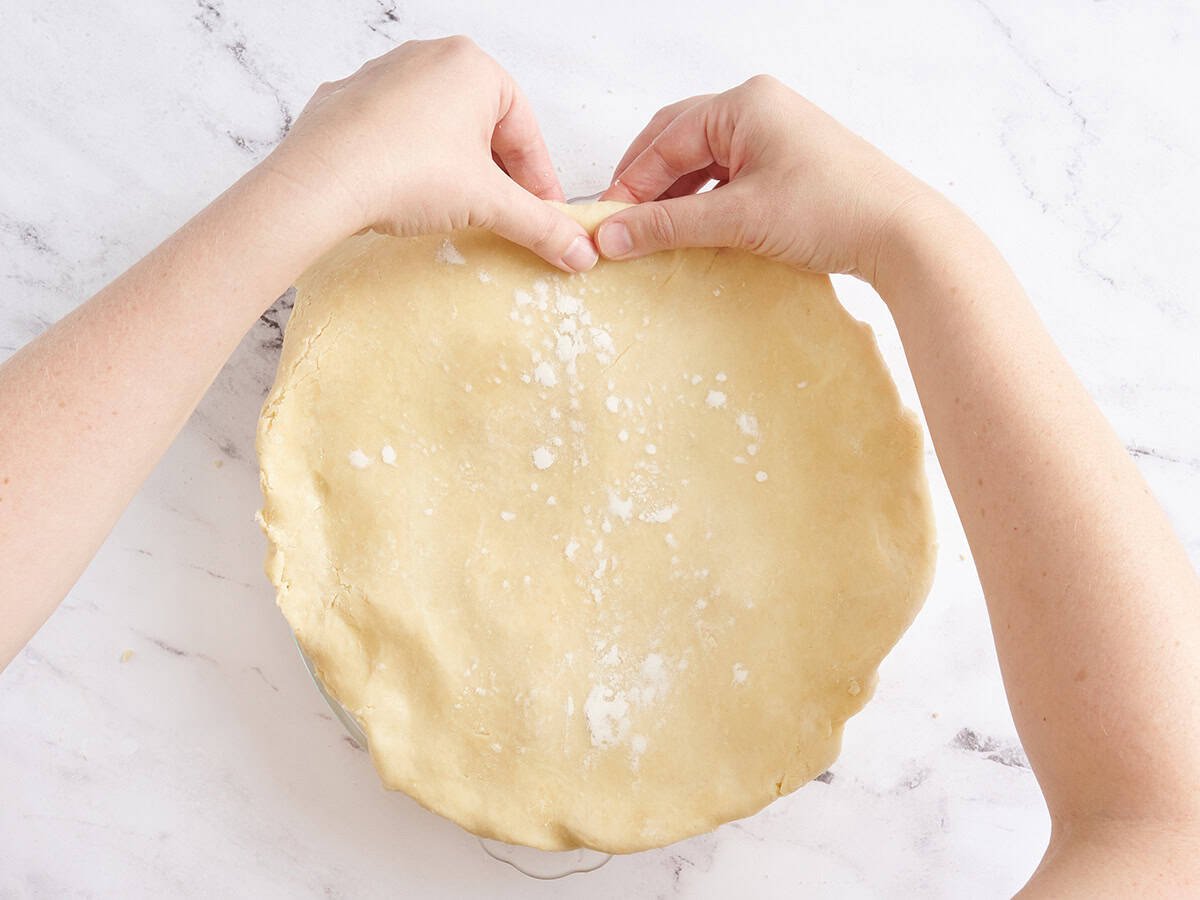
Place the rolled-out top crust over the apples. Use your fingers to fold the top crust under the edges of the bottom crust. Pinch the edges together to create a seal.
Now press around the edges with your fingers to flute the crusts. It doesn’t have to be perfect or fancy!
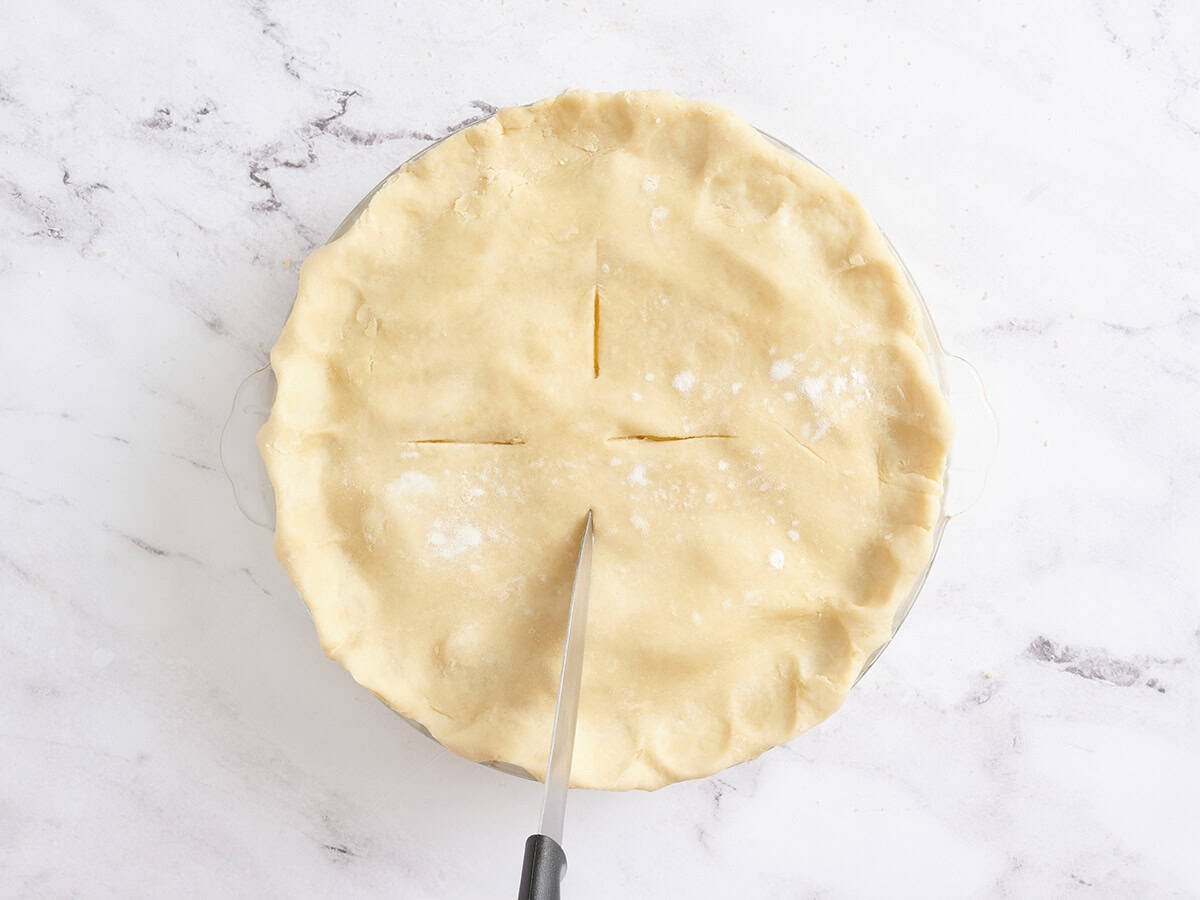
Use a knife to slice four steam vents into the top crust (carefully, avoid slicing too far down into the pie!)
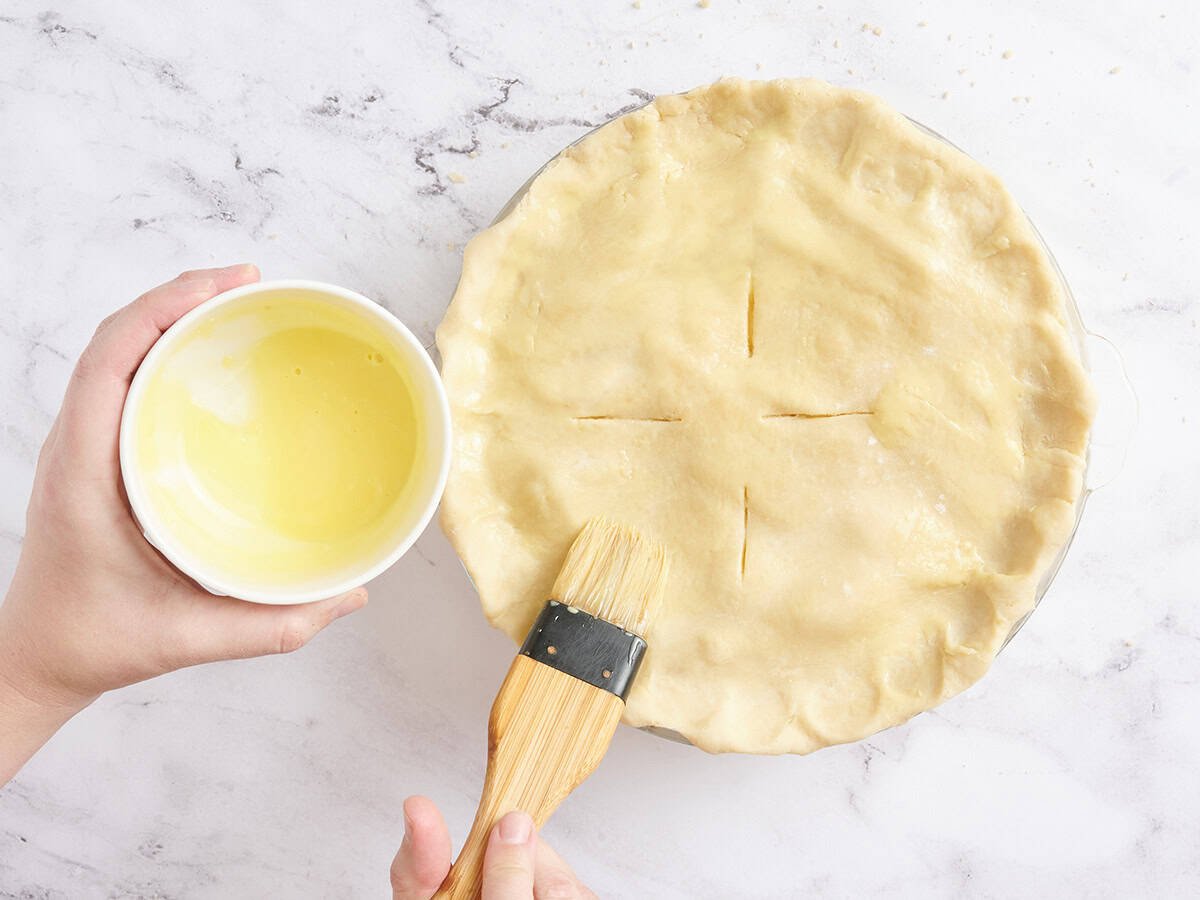
Add 1 Tbsp heavy cream to your separated egg yolk and beat them together. Brush the yolk-cream mixture over the top crust. This will help create a nice, shiny, golden finish once baked.
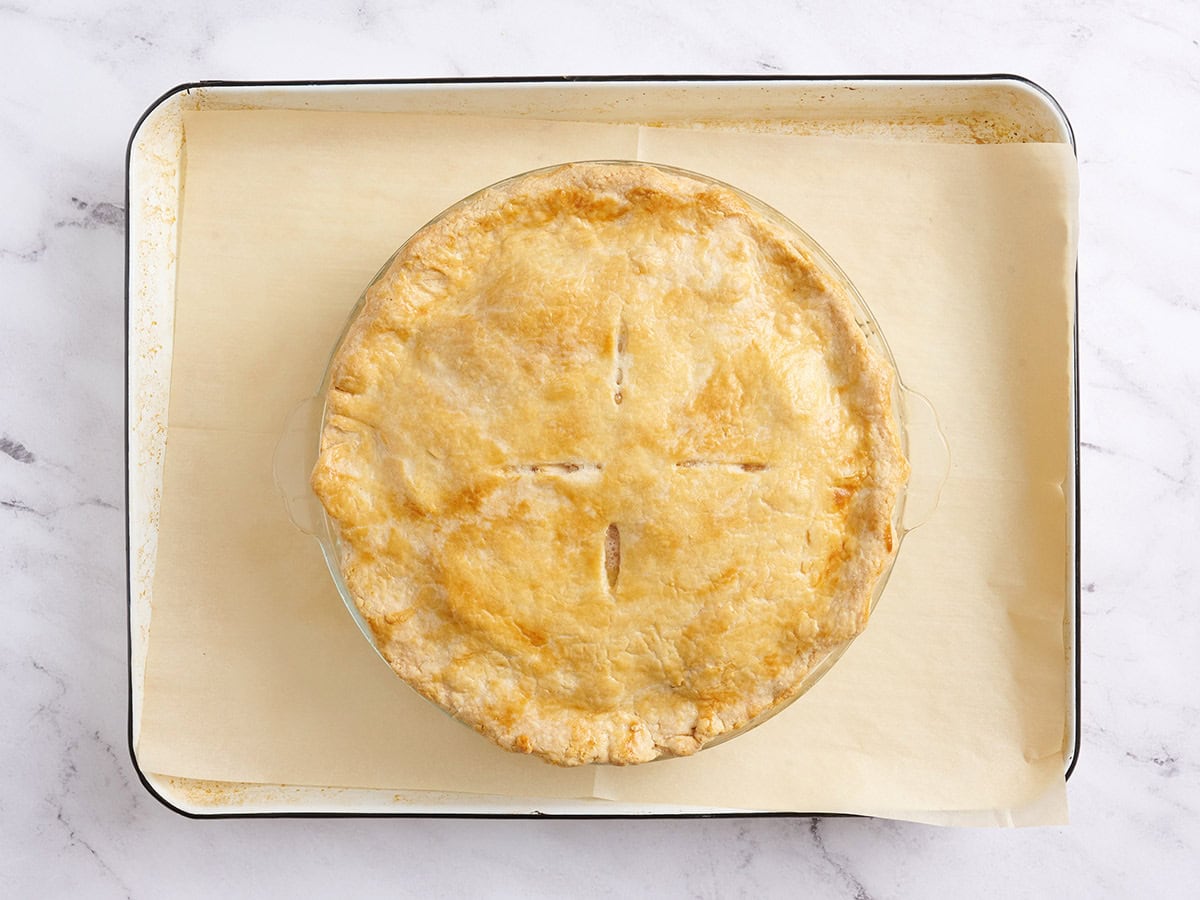
Bake the pie: Place the pie pan on top of your sheet trays in the preheated oven and bake for 45 minutes, or until the top crust is golden brown and the apple juices are bubbling.
Let your homemade apple pie cool for at least 30 minutes before slicing, but preferably an hour to allow the filling to solidify. Enjoy!
How to Avoid a Soggy Bottom
Avoiding a soggy bottom takes more than using the proper crust. I cover all of these tips in my recipe above, but here’s a quick cheat-sheet for you to ensure your apple pie has the crispiest bottom crust EVER:
- Draw out your apples’ natural juices by sprinkling them with sugar and spices. Then cook the juices until they transform into a caramel.
- Cook the apple slices in the caramel for a few minutes, further reducing the liquids and concentrating the flavors.
- Seal your bottom pie crust by brushing it with a small amount of beaten egg white.
- Bake your pie on a double layer of sheet pans, a pizza stone, baking steel, or in a large cast iron pan. These tools trap heat and help cook your bottom crust faster, sealing it, so the juices don’t have time to soak in. Baking your pie in a second pan also has the added benefit of trapping any overflow of juices, so your oven doesn’t start to smoke and set off your alarms.
Storage & Reheating
You can store your baked apple pie covered at room temperature for up to 2 days, or in the fridge for up to a week, per the USDA. However, I recommend enjoying your pie within 3-4 days for the best flavor and texture! Reheat leftovers in the oven at 375°F to crisp the crust back up.
You can also freeze the whole pie or slices for up to 3 months. Be sure to wrap leftovers tightly in plastic wrap and then place them into a freezer-safe container or bag before freezing. Let them thaw in the fridge overnight before reheating.


Our Apple Pie recipe was originally published 10/17/22. It was retested, reworked, and republished to be better than ever 10/29/25.
I’ve been making this pie once or twice a year since the recipe came out, and it’s been a hit each and every time! Compliments have included “smells like childhood,” “the best pie I’ve ever had,” and “better than my grandma’s,” so you KNOW it’s something special! Generally I use a mix of Honeycrisp and Golden Delicious Apples, with maybe a Granny Smith or two.
I decided to experiment this year, and it turns out that this recipe also make 16 muffin tin-sized mini pies, baked at 375 for about 35 mins.
Can you use oat milk instead of heavy cream?
Hi, can this pie be frozen after baking?
That should be fine!
I made this for the first time today and it was DEElicious. It took me a bit longer to make due to it being my first time, but it was well worth it. I used store bought shells which were uncooperative and added to my prep time so will make my own dough next time. Best apple pie recipe I’ve ever made (don’t tell my grandma)! Bravo, Monti!
Never thought to use the apple juice as a caramel, brilliant!
Holy crap this is good! First off, I suck at baking. I thought I would challenge myself by making a pie from scratch. I was 75% sure I messed up the crust but no! Everything was perfect! This recipe was spot on, and although my pie looks a bit rustic, it tastes delightful!! I will definitely be making this again. And again. And again until I can make my crust fluting look nice 😂 Thanks Monti!
Thanks for making my recipe, Randi! Fluting can be such a pain. One of my favorite tricks is to chill the dough again after rolling it into the pan. Once the butter has hardened again, I take the pie pan out. I place my right hand’s thumb and index finger on the inside edge of the crust (about 1/4 inch apart). I fold the index finger on my left hand (so that it’s touching my palm) and place the knuckle on the outside of the crust. Then I press that knuckle gently into the crust, pushing it into the thumb and index finger on my right hand. It creates a great shape. Then I rotate the pie (and not my hands), so I don’t have to move around at all. I hope that helps! XOXO -Monti
Looks like a great recipe, but the $ amount stated for the apples is a bit low, esp. for Honeycrisps. They tend to be over $2 a pound.
We calculate our costs using our receipts. However, my math game is not strong, so I will double check it. Thank you, XOXO -Monti
Wow, this is some *seriously* incredible pie! The caramel/reduced apple juices smelled so good while they were cooking, I knew this was going to be something special… and it was! The apples (Golden Delicious and Honeycrisps – mixing varieties is a great idea) were tender but still had some shape and bite to them, the 3-ingredient crust was buttery and flaky as all get-out, and WOW I cannot wait to bring this to holiday gatherings! And, of course, it made my house smell amazing as it was baking. ;) Thank you for the awesome recipe!
Rose! Thank you so much for making my recipe and for taking the time to leave such a kind comment. It means so much to me. Especially because you are leaving a rating from your experience cooking it. Not everyone does that. You’ve made my whole day! XOXO -Monti
Sooo good! I had to use a different crust recipe but followed everything else and it turned out great!
Hannah, thanks so much for making it! And thanks for leaving a nice comment. Sometimes it gets really hard going through all of these first thing in the morning and having to deal with trolls that just want to lash out for no reason at all. PS It’s all about reducing those apple juices, right?!?! The difference that one step makes is outstanding. XOXO -Monti
Made this and it turned out great! And 5 stars also because of your response to bitter Emily!
I bow down to you, Queen. Thank you for being awesome. XOXO -Monti
Hi Monti,
Thanks for this apple pie recipe. I’ve been enjoying the technical tips in your posts, like the distinction between mealy/flaky pie crusts here or the idea to microwave squash before cutting in your recent squash recipes. I’m interested to try some of these tips the next time I make pie.
Btw, having seen your season of Masterchef, I was pretty tickled to see those worlds collide when you joined the Budget Bytes team. Thanks for sharing your expertise!
Kathy thank you so much for such a kind message! And for remembering me from Masterchef! You made my day! XOXO -Monti
Terrible directions, leaves your oven preheating for over an hour and your pie crust soaking in egg wash while you follow the rest of the recipe. Its hard to believe the author actually used this ever.
Hi Emily. I’ve made this pie at least twice a month for over ten years now, and I’ve won awards for it. It will also be a recipe in my new cookbook for Simon and Schuster. So the recipe works, and very well at that. Perhaps you should read the directions again, as they VERY CLEARLY state “Beat the egg white and brush the bottom crust lightly” and then refrigerate. They do not say to SOAK the bottom crust with egg white. A very LIGHT layer of egg white helps create a seal to prevent a soggy bottom, as anyone with any sort of baking experience knows. You need to preheat your oven (which takes about 20 minutes) but you also need to heat your pizza stone or baking steal, which takes an additional 30 minutes. That’s 50 minutes of REQUIRED preheating. I’m unsure why you are upset about preheating for the required amount of time. Or why you’re upset at all, as it’s obvious that it’s you that has never used the recipe. Keep spreading that infectious joy. XOXO -Monti
Your communication skills need some work too.
Was my answer really that difficult to understand? Strange. 😂 Sending all the love and joy your way. You’re in obvious need of it.😘 XOXO -Monti
Better to ignore rude comments than get dragged into arguments in internet comment sections, even when you know you’re correct. They were rude yes but they are just a internet rando and you’re billed as the editor of this online publication. Your tone does come off as unprofessional here and will alienate the audience this blog has built for many years as well as new readers if you keep it up. Just my 2 cents advice from someone who has been on the internet for a very long time (and followed budget bytes for years!), nothing personal. Fwiw the pie looks good and I’ll give it a try. Take care.
So you bluntly and rudely leave a comment that tells the author her recipe is terrible, she doesn’t know what she’s talking about and is basically a liar and you have the audacity to call into question her communication skills too???? I’m all for turning the other cheek but sometimes you need to defend yourself and your product and I thought she did so with tact.. unlike the extremely rude comment that she was left with. I applaud you and you have gained a follower. I will be baking your apple pie today and if it has even the slightest bit of sassiness that the author has then it will be the best ever!
Thank you so much for having my back, Stephanie! I really appreciate you making the recipe, and I hope you love it as much as I do! XOXO -Monti
Hello again,
True to my word, I made this pie. 😱 OMG! Amazing! I followed the instructions to the tiniest detail and it came out PERFECT! My husband is saying it’s the best thing I’ve ever made.. so thank you for that! Lol! I’ve never made an apple before so believe when I say, if I can do it.. literally, ANYONE can do it! I’m already checking out more of your recipes. Thanks so much for sharing your gift!
HOLY ISH STEPHANIE!!!! You made my whole day!! Thank you for making my recipe. I’m writing a whole book based on it. I’m so stoked you liked it and that your hubs did too! XOXO -Monti
This response from Monti disappoints me. I’ve been following this blog for a long time and I have never seen somebody from this site interact with somebody in this way. It’s rude, unapproachable, and unprofessional.
Furthermore, traditionally, recipes have explained those “moving parts” re the pizza stone, preheating, etc. for people who are unfamiliar with the methods.
The whole gist of this blog is approachability, after all. Perhaps take this as a constructive criticism to not criticize the people who are supporting this site when they get confused.
Beth, this makes me sad. Monti, I hope we never meet.
Agreed Hunter. It is time for me to find a new food blog, budget minded or otherwise. This interaction is ugly and completely unprofessional.
The recipe and intro to the recipe are pretty clear for anyone to read so I’m not sure where Emily struggled to keep up.
The only rude response here is Emily who due to her lack of reading and comprehension saw it fit to insult the recipe author and the recipe itself when clearly others have been able to execute it well (myself included).
I understand beginner cooks needing a little more guidance, of course I once was a beginner too, but how much more instruction do you need in this recipe? “Bake your pie on a pizza stone or baking steel. These tools trap heat and help cook your bottom crust faster, sealing it, so the juices don’t have time to soak in.
If you don’t own a baking steel or pizza stone, bake your pie on a double layer of sheet pans or in a large cast iron pan. Baking your pie in a second pan also has the added benefit of trapping any overflow of juices, so your oven doesn’t start to smoke and set off your alarms.”
I see an explanation on the purpose of the pizza stone as well as alternatives if you don’t have one. There’s not much moving with a pizza stone beyond putting it in the oven so it’s hardly a complicated piece of equipment.
We’re all here to cook and if a recipe doesn’t work you can try to troubleshoot or ask for assistance but we are NOT here to insult the recipe writers by insinuating that they made up a recipe just because we can’t read 11 relatively simple steps.
Aileen, Beth and I both are so stoked to have you here. Thank you for your understanding and kindness. We work really hard (as in 7 days a week) to make simple budget-friendly recipes for people that really need them. A one-star rating on a truly great recipe means it doesn’t rank on Google. So all of our hard work (in this case years of perfecting this recipe) goes down the drain because people won’t see the recipe or pass on it if they do see it, because of a low star rating. It’s even more insulting when the person hasn’t even bothered to read the whole blog post, much less make the recipe. Thank you for making our day. XOXO -Monti
Muy rico voy aprender hacerlo gracias por la instrucion
Gracias Raisa!! Que tengas buen dia! XOXO -Monti