This Yellow Rice Chicken Skillet combines one of my favorite foods in the world, Yellow Jasmine Rice, with a couple of items that I found in the back of my freezer. I found some chicken thighs in my freezer (leftover from Lemon Pepper Chicken with Orzo) and I added some peas for extra color, flavor, and texture (another “back of the freezer” find). Everything cooks in the same skillet for more flavor and less cleanup. I love it when you can cook the main dish (chicken) and the two sides (rice and peas) all in one vessel. Hello, Yellow Rice Chicken Skillet!

All recipes are rigorously tested in our Nashville Test Kitchen to ensure they are easy, affordable, and delicious.
Can I Use Boneless Chicken?
Yes, but keep in mind that boneless cuts of chicken cook much faster than bone-in chicken, so you run the risk of overcooking the meat. With chicken thighs this isn’t as big of an issue since the meat is fattier and does not dry out as quickly, but if you’re using boneless chicken breast it may become slightly dry.
Tips for One Pot Rice Dishes
Cooking rice can be a little tricky for some, and the same is true for one pot rice dishes where you are cooking rice in the same pot with meat and vegetables. Here are a few tips to help your one pot rice dish a success:
- Use thick, heavy cookware. If you are using thin cook ware you are more likely to have hot and cold spots in the pot which will lead to pockets burned and/or undercooked rice. Thicker cookware heats and cooks more evenly.
- Use a pot or deep skillet that is close in size to the burner. If the burner is too small for the bottom of the pot, you again run the risk of it heating unevenly and the rice in the edges of the pot undercooking.
- Make sure the liquid maintains a simmer. You may need to adjust the heat slightly up or down to keep the liquid simmering, depending on the characteristics of your range top and cookware. If the liquid isn’t simmering the rice will not cook through.
What Kind of Skillet Should I Use?
I’m using a 4 quart stainless steel deep skillet for this recipe, but this recipe also works great with a Dutch oven. The two most important things you need in a piece of cookware for this recipe are: that it is thick and heavy so it heats evenly and it has a lid. And you’ll probably want something that at least 3 quarts in volume.
Can I Use Plain White Rice?
You can substitute plain long grain white rice in place of the jasmine rice, but you will lose out on some of the fantastic flavor that jasmine rice has. To find the best price on jasmine rice, check the bottom shelf of the rice aisle for the larger 5 lb. bags of jasmine rice. Avoid the small specialty packages, which are usually found on higher shelves.

Yellow Rice Chicken Skillet
Cost $6.04 recipe / $1.51 serving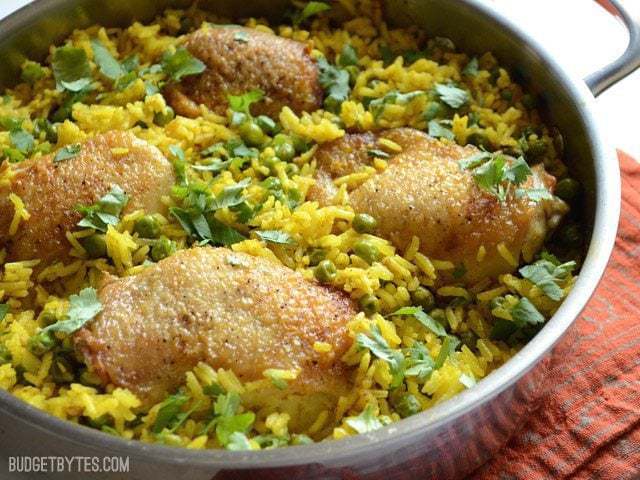
Ingredients
- 1 Tbsp cooking oil ($0.02)
- 4 bone-in, skin-on chicken thighs ($3.48)
- 1 pinch salt and pepper ($0.05)
- 2 cloves garlic, minced ($0.16)
- 1 tsp turmeric ($0.10)
- 1/2 tsp ground cumin ($0.05)
- 1/4 tsp cinnamon ($0.03)
- 1.5 cups long grain jasmine rice ($0.78)
- 1.5 cups frozen peas ($0.72)
- 2.5 cups chicken broth* ($0.33)
- 1/4 bunch fresh cilantro (optional) ($0.32)
Instructions
- Pat the chicken thighs dry with a paper towel, then season both sides with salt and pepper.
- Heat a large deep skillet over medium heat. Add the oil, then tilt the skillet to spread the oil over the surface. Place the chicken thighs in the skillet, skin side down, and allow to brown before flipping (about five minutes). Flip the thighs and let brown on the second side (another five minutes). Remove the browned thighs to a clean plate.
- If there is excess oil in the skillet, pour it off into a bowl to cool, leaving about 1 tablespoon of oil and fat in the skillet. Add the minced garlic, turmeric, cumin, and cinnamon to the skillet. Sauté for about one minute, or until the garlic is soft and fragrant.
- Pour the chicken broth into the skillet and use a wooden spoon to dissolve any browned bits off the bottom of the skillet. Once the browned bits are dissolved, add the frozen peas and rice, and give it a quick stir to distribute the broth and spices. Nestle the browned chicken thighs into the rice and peas.
- Place a lid on the skillet and turn the heat up to medium-high. allow it to come to a boil. Once it reaches a boil, turn the heat down to low (or just above low) and let the skillet simmer for 25 minutes. After 25 minutes, turn the heat off and let it sit undisturbed for an additional 10 minutes. Finally, remove the lid and fluff the rice with a fork, mixing the peas in as you go. Top with fresh cilantro, if desired.
See how we calculate recipe costs here.
Notes
Nutrition Information
Scroll down for the step by step photos!

How to Make Chicken and Yellow Rice – Step by Step Photos
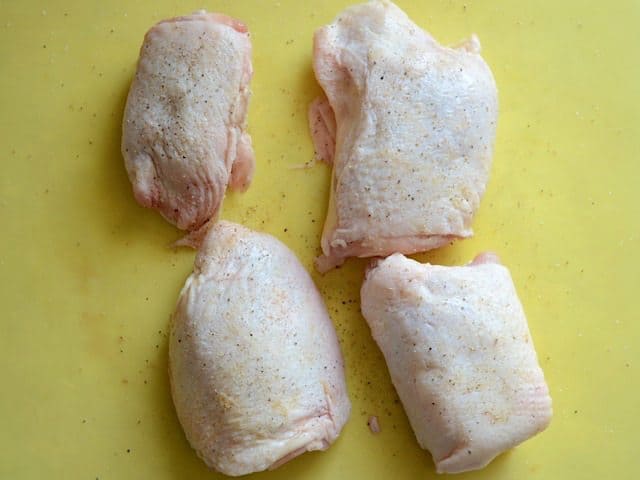
Start with four bone-in chicken thighs, with skin. Pat them dry with a paper towel, then season both sides with salt and pepper. Drying the surface helps them brown better in the skillet.

Heat a large deep skillet over medium flame. Once hot, add 1 Tbsp vegetable or canola oil. Tilt the skillet to spread the oil over the surface. Add the chicken thighs, skin side down, and allow them to brown before moving them (they will actually kind of stick to the surface until they are brown, at which point they usually “release”). Flip the thighs and brown on the other side. Once both sides are browned, remove the chicken to a clean plate.
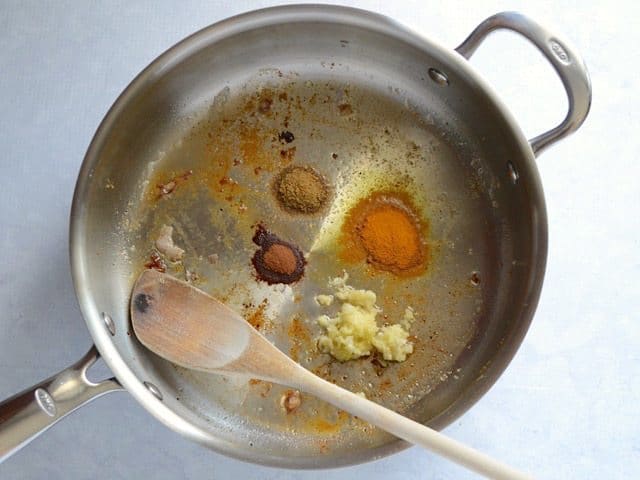
If a lot of fat rendered off of the chicken thighs, pour some out until there is about a tablespoon or so left in the skillet. Add 2 cloves of minced garlic, 1 tsp turmeric, 1/2 tsp cumin, and 1/4 tsp cinnamon. Sauté the garlic and spices for about a minute, or just until the garlic is soft and fragrant (but has not browned).
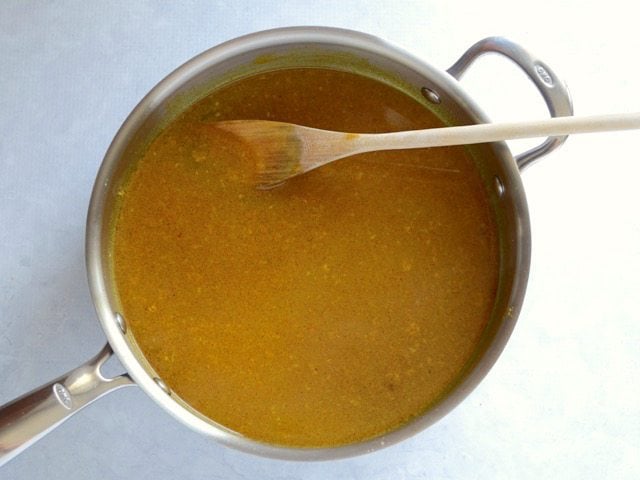
Deglaze the skillet with 2.5 cups of chicken broth. “Deglaze” just means to use the chicken broth to dissolve any browned bits (called fond) off the bottom of the skillet. The browned stuff is the good stuff.
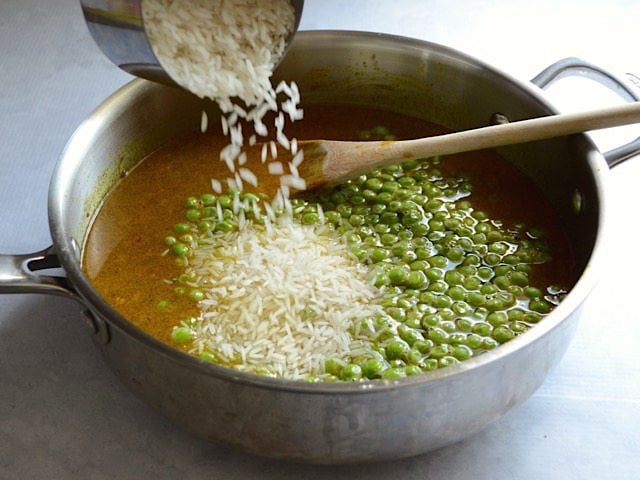
Finally, add 1.5 cups of frozen peas and 1.5 cups long grain jasmine rice. Give the skillet a quick stir to distribute the spices among the peas and rice.
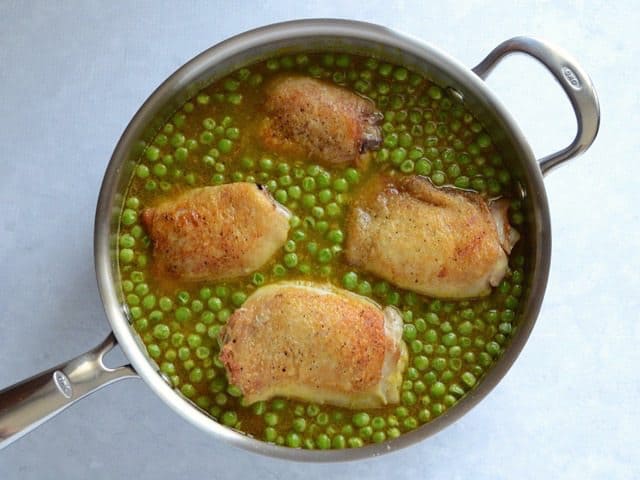
Return the browned chicken to the skillet, nestling it into the rice and peas.

Place a lid on the skillet and turn the heat up to medium high. Allow it to come to a boil. Once it boils, reduce the heat to low (or just above low – so that it doesn’t stop simmering) and let the skillet simmer for 25 minutes. After 25 minutes, turn the heat off and let it sit undisturbed, with the lid on, for ten more minutes. The photo above is what it looks like after simmering and resting.

Use a fork to fluff the rice and stir it up a bit. All the peas and many of the spices float to the top while it simmers, so use the fluff time as a way to make sure everything is evenly mixed.

Top with fresh cilantro, if desired. YUM!

Of course, I divided my Yellow Rice Chicken Skillet up into individual containers so I could just grab one at a time and microwave it to reheat. These also freeze decently well.


This is one of my favorite dinner recipes and is something that I make on a weekly basis. I personally sub out peas for carrots but otherwise keep everything else the same. This has always been a hit anytime I make it, and I just wanted to come here and say thank you!
I have made this recipe at least a dozen times now and it is delicious! It’s my husband’s favorite chicken and rice dish that I make! The only thing I leave out is the cilantro because my husband hates it and it’s even delicious without it! I even made a vegan version when we were eating less meat one time with “chik’n” pieces and it was still delicious! I have since returned to making it with bone-in skin on chicken thighs and that’s my favorite. I made it some times with skinless boneless chicken thighs and also chicken breast but the original is still by far the best. It makes it so much more flavorful and rich. It does make more rice but quite frankly, I love that.
I oven bake my thighs instead of pan frying as I never have good luck with them cooking all the way through, but I love this recipe and it has quickly become a staple in our home!
Fantastic Recipe!
The only thing I would mention is that this made a lot of rice for just 4 thighs, so just keep that in mind.
Next time I be using 6 thighs.
I subbed jasmine for basmati but was it was still just great!
This was so easy to prepare! I used thin chicken breasts because that’s what I had. I cooked them separately because I didn’t want them to dry out. The flavor was amazing! I love this website!
Yum! Thank you Beth this was delicious. My family particularly loved the rice. I threw in baby spinach at the end for even more green. 💚💚💚💚
This is called biryani! Thanks for making it easy to cook. Husband loves biryani and he says it’s spot on!
This is not biryani. You are clearly not Indian if you think this is biryani. Every culture has a rice and chicken dish that is similar to this. Indian biryani is a lot more complex and has way more spices involved.
Hello.This chicken n rice dish can also be prepared in the oven! After browning the chicken on both sides and saute vegetable seasonings, then toast powdered seasonings put remaining ingredients in dutch oven with chicken on top. Cover dutch oven and place it in preheated 375 degree oven for 90 minutes.l like this set it and forget it method whereby the oven does all the work!
This was so easy, and so delicious! I’m a huge fan of less cleanup and less dishes, so I felt like a genius watching a whole meal come together like this. I also liked how the skin on the chicken thighs stayed nice and crispy, while absorbing all of the flavor from the spices and aromatics.
It was a coincidence that everyone in my family ended up eating something else the night I made this, but I wasn’t mad because I got to eat all of it by myself. Not in one sitting, just to be clear!
This is SO SO good. I added some ginger and onions because I had them on hand. Next time I’ll replace part of the water with coconut milk. YUM.
I feel like an experienced home cook and still learn all kinds of techniques from you. Thank you for spelling out the “whys” like this:
(they will actually kind of stick to the surface until they are brown, at which point they usually “release”).
So easy and delicious. I used drumsticks instead of thighs because that’s what I had on hand. Thank you for sharing your recipes!
I made this and it was excellent with a few modifications. I added an inch of chopped up ginger, some cardamom pods, and I used a whole chicken which I cut into 2-legs, thighs, breasts, and wings.
First I browned the chicken. I wanted a crispier skin so I browned it longer than the five minutes.
Next I added the rice to the oil after removing the chicken to coat and toast. Then I added the garlic ginger and spices, before I added the broth to deglaze. One other thing, I always add a tablespoon to a cup of broth to give it a more homemade stock texture.
I followed the recipe to a T and even tripled the seasoning, this recipe had no flavor and I am unsure why. The spices were all brand new. The food smelled excellent but the taste was just not there.
You may have just needed to increase the salt. Salt can help make flavors more pronounced and we all have different sensitivities when it comes to salt receptors on our taste buds. :)