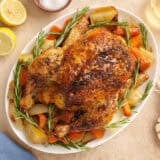
Roasted Chicken
This roasted chicken recipe gives you crispy skin bathed in butter and meat that's softly scented with lemon, garlic, and rosemary. It's a must try!
Servings: 6 servings
Calories: 291kcal
Equipment
- Roasting Pan with Wire Rack
- Small Bowl
- Meat Thermometer
Ingredients
- 1 whole chicken 5 lbs, $8.97
- 5 tsp coarse sea salt or kosher salt, $0.10
- 2 russet potatoes about 2 lbs., $1.60
- 1 onion $0.94
- 3 carrots $0.30
- 1 Tbsp dried rosemary $0.65
- 8 Tbsp salted butter softened, $0.99
- 1 head of garlic $0.64
- 1 lemon $0.64
Instructions
- Gather ingredients. Place a rack in the center of your oven and preheat it to 425°F. Remove the chicken from its packaging.
- Remove the innards from the chicken.
- Dry the chicken thoroughly inside and out with paper towels.
- Dry brine the chicken by rubbing salt on it, inside and out (on top of the skin). Use 1 teaspoon of kosher salt or coarse sea salt per pound of meat. Or ½ teaspoon of fine sea salt or iodized salt per pound of meat. Let it rest uncovered in your fridge for at least an hour, but preferably overnight.
- Chop the vegetables. Quarter an onion, slice the carrots, and quarter the potatoes.
- Add the dried rosemary to the softened butter and mix thoroughly.
- Half the bulb of garlic and quarter the lemon.
- Add the prepared vegetables to the bottom of your roasting pan.*
- Place the chicken on a rack over the vegetables and pat it dry again, brushing off any extra salt.
- Add the garlic and the lemon into the cavity of the chicken.
- Cover the chicken inside and out with butter. Work your way under the skin on the breast and add butter there too.
- To truss your chicken without using twine, tuck the wings behind the chicken’s back (as shown in the step photos below). This will keep the wings from burning.
- Then, with a knife, carefully poke a hole in one side of the skin hanging off the breast, covering the cavity opening. Carefully stick each drumstick into the hole.**
- Roast your chicken at 425°F for about 20 minutes per pound, or until a meat thermometer inserted into the breast reads 160°F and inserted into the thigh it reads 170°F. Remove the chicken from the pan and place it on a serving platter. Let it rest for at least ten minutes before carving it. Serve with roasted vegetables topped with any drippings and enjoy.
See how we calculate recipe costs here.
Video
Notes
*A roasting pan with a rack is ideal because you want enough space between the vegetables and the chicken for air to circulate around the meat. You can also use a cast-iron skillet and nestle the bird on top of the veggies. In fact, you can roast in almost any low-walled oven-safe dish if it's big enough. For example, use a pie pan or a brownie tin. All that matters is that the sides of the pan don't block the sides of the chicken. They need to be exposed to develop color and get crispy.
**The legs may end up popping out as the chicken cooks and the skin shrinks, but this will help keep your chicken plump and roasting perfectly.
Nutrition
Serving: 1cup | Calories: 291kcal | Carbohydrates: 11g | Protein: 16g | Fat: 21g | Sodium: 334mg | Fiber: 1g