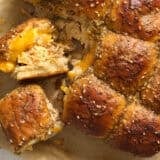
Chicken Sliders
These easy Chicken Sliders are made with Hawaiian rolls, creamy rotisserie chicken filling, cheddar cheese, and a savory butter topping. Ready in 45 minutes!
Servings: 6 servings (2 each)
Calories: 594kcal
Equipment
- 9x11'' Oven Safe Dish
- Medium Bowl
- Small Bowl
Ingredients
Chicken Sliders
- nonstick cooking spray $0.01
- 12 Hawaiian sweet rolls $2.68
- 1 lb. rotisserie chicken shredded, (about 4 cups) $3.97*
- ¼ red onion small dice (about ¼ cup, 60g) $0.26
- ½ cup mayonnaise 135g, $0.57**
- 2 oz. cream cheese softened, $0.49**
- ½ tsp salt $0.02
- ¼ tsp black pepper freshly cracked, $0.04
- ½ tsp garlic powder $0.02
- 1 cup cheddar cheese grated, (100g) $0.79***
Butter Topping
- 2 Tbsp butter melted, $0.22
- 1 Tbsp Dijon mustard $0.07
- 1 Tbsp Worcestershire sauce $0.05
- 1 Tbsp everything bagel seasoning $0.23****
Instructions
- Gather and prepare all ingredients. Preheat your oven to 350°F and grease a 9x11” baking dish.
- Slice the rolls in half lengthwise and place the bottom half in the baking dish.
- In a medium bowl, combine the shredded chicken, diced red onions, mayonnaise, cream cheese, salt, pepper, and garlic powder.
- Layer the chicken mix evenly on the bottom of the Hawaiian rolls.
- Top the chicken evenly with the cheddar cheese.
- In a small bowl, stir together the melted butter, Dijon mustard, Worcestershire sauce, and everything bagel seasoning.
- Place the top of half of the Hawaiian rolls on the chicken and cheese. Using a brush, evenly cover the top rolls with the melted butter mixture.
- Cover the dish with aluminum foil.
- Place the dish on the center rack in the oven and bake for 20 minutes, then remove the aluminum foil and continue cooking for an additional 10 minutes.
See how we calculate recipe costs here.
Notes
*I used a whole chilled rotisserie chicken found in the refrigerated prepared meats section of my local Walmart. It’s cheaper than the hot rotisserie chicken and SNAP approved. You can also use 1lb. of our crockpot shredded chicken, leftover baked chicken breasts, or even grilled chicken.
**You can substitute the mayo or cream cheese with sour cream or plain yogurt for a tangier flavor. You can also omit either and make it a drier, less-creamy tasting chicken filling.
***I love cheddar and think it goes well with these easy chicken sliders. You can also use provolone, mozzarella, or your favorite melty cheese.
****Everything bagel seasoning is a mix of sesame seeds, poppy seeds, dried garlic, dried onion, and salt. If you don’t have it, swap in your favorite herb or spice blend, or keep it simple with just sesame seeds or poppy seeds.
The meat from one rotisserie chicken can weigh over one pound, so make sure to utilize any extra in another recipe! I've shared some ideas for using leftover rotisserie chicken under the step-by step photos below.
Nutrition
Serving: 1serving (2 sliders) | Calories: 594kcal | Carbohydrates: 32g | Protein: 32g | Fat: 38g | Sodium: 1122mg | Fiber: 0.2g